Datagrid
NOTE: The Grafana datagrid is experimental. This feature is supported by the engineering team on a best-effort basis, and breaking changes may occur without notice prior to general availability.
Datagrids offer you the ability to create, edit, and fine-tune data within Grafana. As such, this panel can act as a data source for other panels inside a dashboard.
image::screenshot-grafana-datagrid-panel.png
Through it, you can manipulate data queried from any data source, you can start from a blank slate, or you can pull data from a dragged and dropped file. You can then use the panel as a simple tabular visualization, or you can modify the data—and even remove it altogether—to create a blank slate.
Editing the dataset changes the data source to use the inbuilt -- Grafana -- data source, thus replacing the old data source settings and related queries, while also copying the current dataset into the dashboard model.
You can then use the panel as a data source for other panels, by using the inbuilt -- Dashboard -- data source to pull the datagrid data. This allows for an interactive dashboard experience, where you can modify the data and see the changes reflected in other panels.
Learn more about the inbuilt -- Grafana -- and -- Dashboard -- data sources in the special data sources documentation.
Context menu
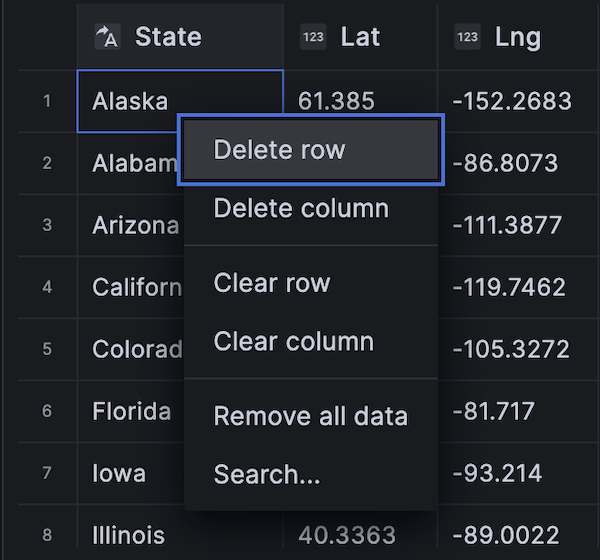
To provide a more streamlined experience, the datagrid has a context menu that can be accessed by right-clicking on a cell, column header, or row selector. Depending on the state of your datagrid, the context menu offers different options including:
-
Delete or clear rows and columns.
-
Remove all existing data (rendering your datagrid blank).
-
Trigger search functionality, which allows you to find keywords within the dataset.
Deleting a row or column will remove the data from the datagrid, while clearing a row or column will only remove the data from the cells, leaving the row or column intact.

Selecting series
If there are multiple series, you can set the datagrid to display the preferred dataset using the Select series dropdown in the panel options.
Using datagrids
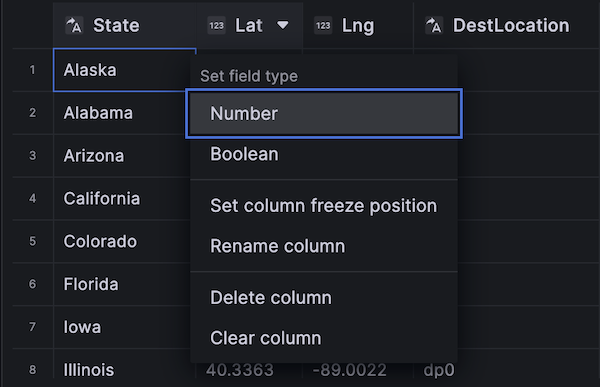
Datagrids offer various ways of interacting with your data. You can add, edit, move, clear, and remove rows and columns; use the inbuilt search functionality to find specific data; and convert field types or freeze horizontal scroll on a specific column.
Add data
You can add data to a datagrid by creating a new column or row.
To create a new column, take the following steps:
-
In an existing panel, click the + button in the table header after the last column.
-
When prompted, add a name for the new column.
-
Click anywhere outside the field or press the Enter key to save the column.
Now you can add data in each cell.
To add a new row, click a + button after the last row. The button is present in each cell after the last row, and clicking it triggers the creation of a new row while also activating the cell that you clicked.
Edit data
You can edit data by taking the following steps:
-
Double-click on the cell that needs to be modified. This will activate the cell and allow you to edit the data.
-
After editing the data, click anywhere outside the cell or press the Enter key to finalize the edit.
To easily clear a cell of data, you can click on a cell to focus it and then press the Delete key.
Move data
You can move columns and rows as needed.
To move a column, take the following steps:
-
Click and hold the header of the column that needs to be moved.
-
Drag the column to the desired location.
-
Release the mouse button to finalize the move.
To move a row, click and hold on the row selector from the number column situated on the far left side of the grid, and drag it to the desired location. Releasing the mouse button finalizes the move.
Select multiple cells
You can select multiple cells by clicking on a single cell and dragging the mouse across others. This selection can be used to copy the data from the selected cells or to delete them using the Delete key.
Delete/clear multiple rows or columns
To delete or clear multiple rows, take the following steps:
-
Hover over the number column (to the left of the first column in the grid) to display row checkbox.
-
Select the checkboxes for the rows you want to work with. To select multiple consecutive rows, press and hold the Shift key while clicking on the first and last row. To select non-consecutive rows, press and hold the Ctrl (or Cmd) key while clicking the desired rows.
-
Right-click to access the context menu.
-
Select Delete rows or Clear rows.
The same rules apply to columns by clicking the column headers.
To delete all rows, use the “select all” checkbox at the top left corner of the datagrid. This selects all rows and allows you to delete them using the context menu.
