General Configuration
TDP component configuration
Configuration is the step in which a TDP Kubernetes component is adapted to the environment and the chosen mode of operation.
It defines how the component will be deployed, which resources it will use, how it will be exposed, which dependencies it needs, and how it will integrate with other platform services.
In practice, configuration allows adjusting parameters such as namespace, CPU, memory, storage, secrets, external access, persistence, and shared integrations — such as databases, object storage, and supporting services.
This means the same component can be used in different contexts, such as lab, staging, and production, without changing its main function.
Examples:
- Connecting Airflow to the cluster's PostgreSQL instead of using the built-in database
- Telling Kafka how many broker replicas and what minimum replication factor to use
- Telling NiFi where the LDAP server is for authentication
- Configuring the Ozone S3 Gateway with the correct credentials so Spark can write data
Configuration parameters apply regardless of the installation method used.
The goal of this page is to explain what can normally be configured in a TDP component and how those adjustments work in practice.
Throughout this section, the most common configuration patterns across TDP components are presented:
| Area | What it defines | Examples |
|---|---|---|
| Cluster execution | Where and with which resources the component will run. | Namespace, CPU, memory, replicas, and limits. |
| Persistence | How data will be stored. | Volumes, disk, storage class, and retention. |
| Service exposure | How the component will be accessed. | Service, port, ingress, hostname, and TLS. |
| Security and access | How credentials and sensitive data will be provided. | Secrets, users, passwords, tokens, and secret references. |
| Integrations | How the component connects to other services. | PostgreSQL, S3/Ozone, endpoints, and shared services. |
| Application method | How configuration reaches the cluster. | Helm, Argo CD/GitOps, and future tdpctl. |
Where to find available parameters
Before customizing a component's configuration, there are three main sources:
- The component page in this guide — each component has a page with supported parameters, examples, and component-specific notes.
- The chart's
values.yaml— contains all accepted parameters with their default values and explanatory comments; accessible viahelm show values. - The chart's README — available in the registry, provides an overview of options and use cases.
Run helm show values oci://registry.tecnisys.com.br/tdp/charts/<CHART_NAME> to export all available parameters with their default values and explanatory comments.

This command exports the chart's default values to a local file values-padrao.yaml.
This file can be used as a reference to identify which parameters to adjust for the environment.
Custom values file
Component configuration is done through a YAML file containing only the parameters that need to differ from the chart's defaults.
There is no need to copy the entire chart values file — include only the keys you want to override.
The values file defines what will be configured. Helm or Argo CD define how that configuration will be applied to the cluster — in both flows, the format and parameters are identical.
Minimal values file example:
# Include only what needs to differ from the default
resources:
  requests:
    cpu: "500m"
    memory: "1Gi"
  limits:
    cpu: "2"
    memory: "2Gi"

persistence:
  size: 20Gi
  storageClassName: "nfs-fast"
- How to apply configuration
- Common patterns across TDP charts
- Environment decisions that affect configuration
The procedures below show how to apply the values to the cluster via Helm or Argo CD.
- Via Helm
- Declarative GitOps with Argo CD
- Commands
- Videos
Helm automatically merges your values with the chart defaults — include only the keys you want to customize.
Ways to provide values
Values file (recommended) — create a YAML with the keys to change and pass it with -f:
helm upgrade --install <RELEASE_NAME> oci://registry.tecnisys.com.br/tdp/charts/<CHART_NAME> \
  -n <NAMESPACE> --create-namespace \
  -f meu-values.yaml
--set flag — for one-off changes directly on the command line:
helm upgrade --install <RELEASE_NAME> oci://registry.tecnisys.com.br/tdp/charts/<CHART_NAME> \
  -n <NAMESPACE> --create-namespace \
  --set parameter.key=value
File combination — multiple files merged in order, with later files taking precedence:
helm upgrade --install <RELEASE_NAME> oci://registry.tecnisys.com.br/tdp/charts/<CHART_NAME> \
  -n <NAMESPACE> --create-namespace \
  -f values-base.yaml \
  -f values-production.yaml
Step by step
Before starting, export the values accepted by the chart. See Where to find available parameters.
- Create the values file (e.g.:
meu-values.yaml):
code .\meu-values.yaml
- Adjust the desired parameters, such as namespace, resources, or integrations:
resources:
  requests:
    cpu: "500m"
    memory: "1Gi"
  limits:
    cpu: "1"
    memory: "2Gi"
- Apply the configuration with the created file:
helm upgrade --install <RELEASE_NAME> oci://registry.tecnisys.com.br/tdp/charts/<CHART_NAME> \
  -n <NAMESPACE> --create-namespace \
  -f meu-values.yaml
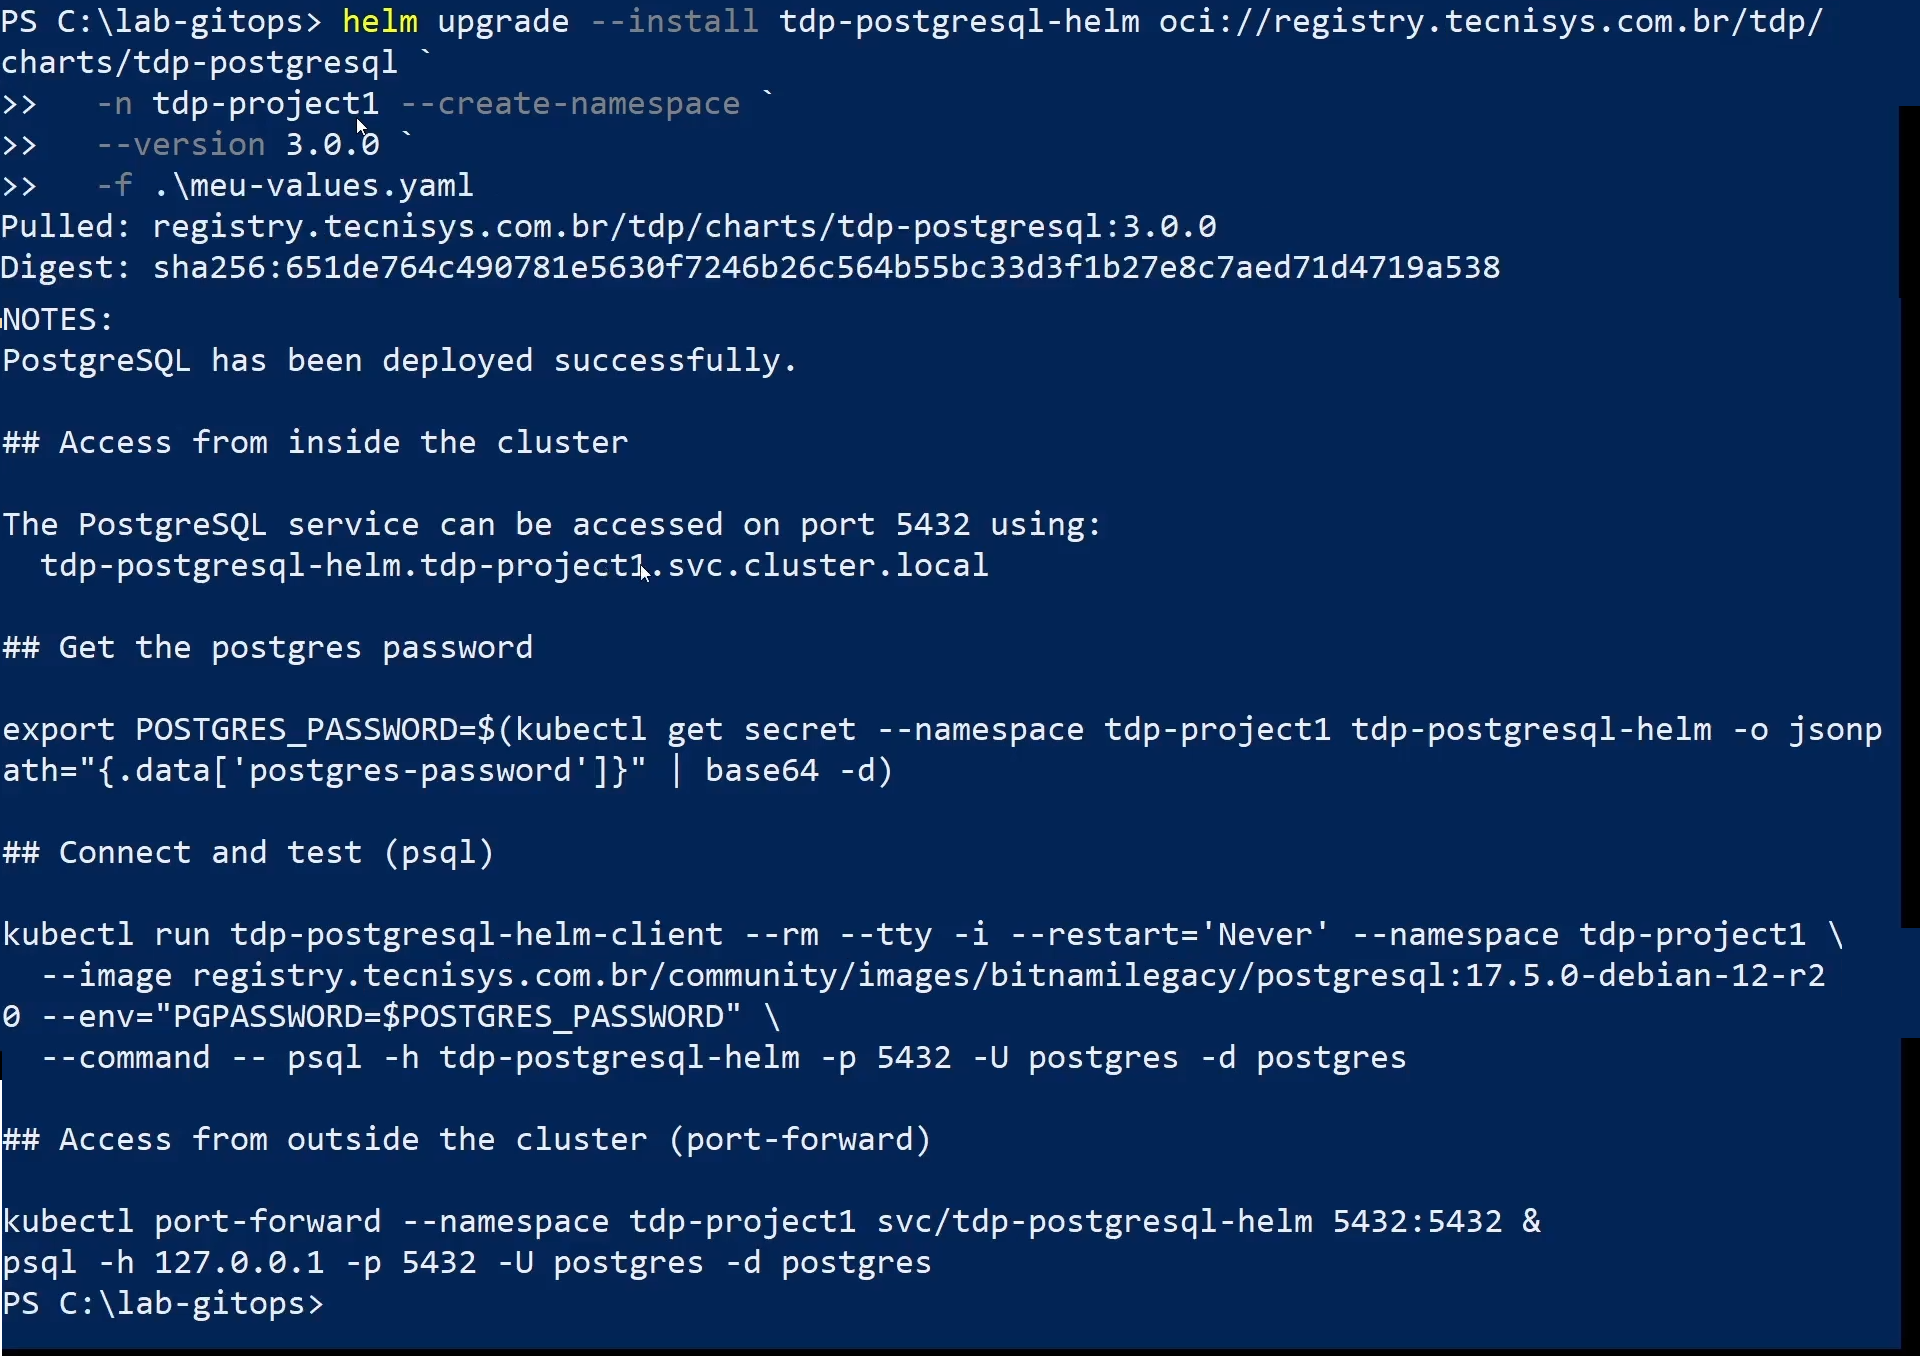
- Verify that the configured values were applied:
helm get values <RELEASE_NAME> -n <NAMESPACE>
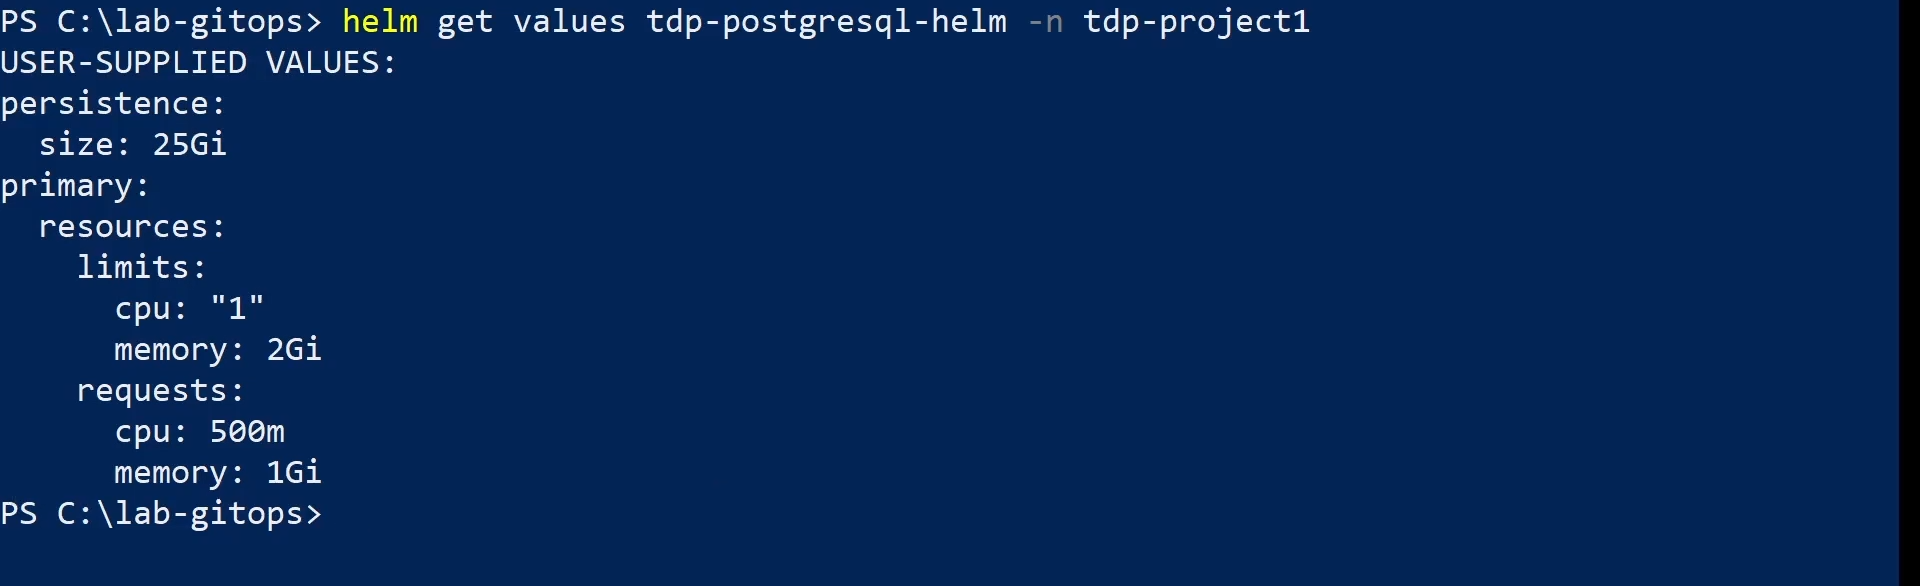
- Check the pods:
kubectl get pods -n <NAMESPACE>

For stateful components, such as PostgreSQL, also validate:
kubectl get statefulset -n <NAMESPACE>

For components using Deployment, also validate:
kubectl get deploy -n <NAMESPACE>
- Confirm that the release has
deployedstatus and the revision is updated:
helm list -n <NAMESPACE>
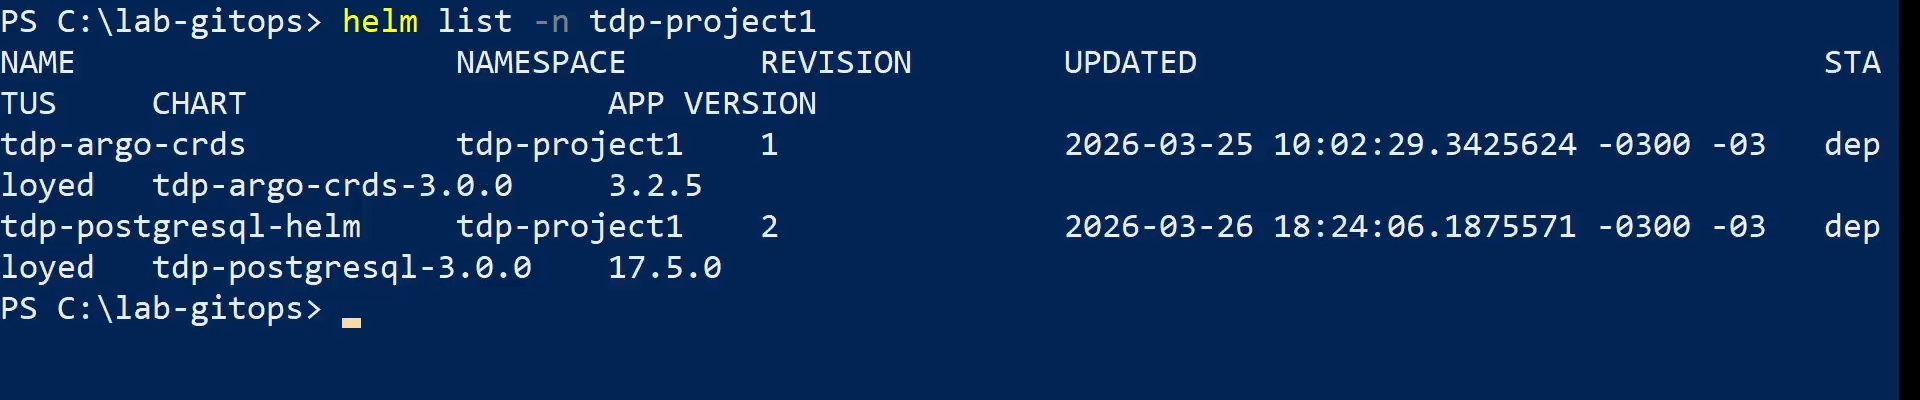
- helm show values
- helm upgrade --install
- helm get values
- kubectl get pods
- kubectl get statefulset
- helm list
- Commands
- Videos
How it works
In the GitOps flow, component configuration is declared in values.yaml files versioned in the Git repository — exactly the same parameters used in the Helm flow.
There is no separate set of "Argo CD parameters": what changes is that Argo CD continuously monitors the repository, compares the state declared in Git with the current cluster state, and applies the differences — without needing to run installation commands directly.
Three central concepts guide this flow:
Application — a Kubernetes resource managed by Argo CD that points to a Helm chart and a values file in the repository.
Each TDP component has its own Application.
Synchronization (Sync) — the process by which Argo CD compares the state declared in Git with the current cluster state and applies the differences.
Can be automatic (when automated is enabled in the Application) or manual (argocd app sync).
Continuous reconciliation — when selfHeal: true is configured, Argo CD automatically corrects any drift between the cluster and Git, even if someone changed something directly in the cluster.
To change a component's configuration, the values file is edited in the repository and the change is pushed to Git.
Argo CD detects the change and applies it — without running installation commands.
Step by step
- Access the GitOps repository:
cd ./tdp-GitOps
- Open the component values file indicated on the component-specific page:
code .\path\to\values.yaml
Or, alternatively:
notepad .\path\to\values.yaml

- Adjust the desired parameters in the file:
primary:
  resources:
    requests:
      cpu: "500m"
      memory: "512Mi"
persistence:
  size: 10Gi
primary:
  resources:
    requests:
      cpu: "1200m"
      memory: "1Gi"
    limits:
      cpu: "1"
      memory: "2Gi"
persistence:
  size: 25Gi
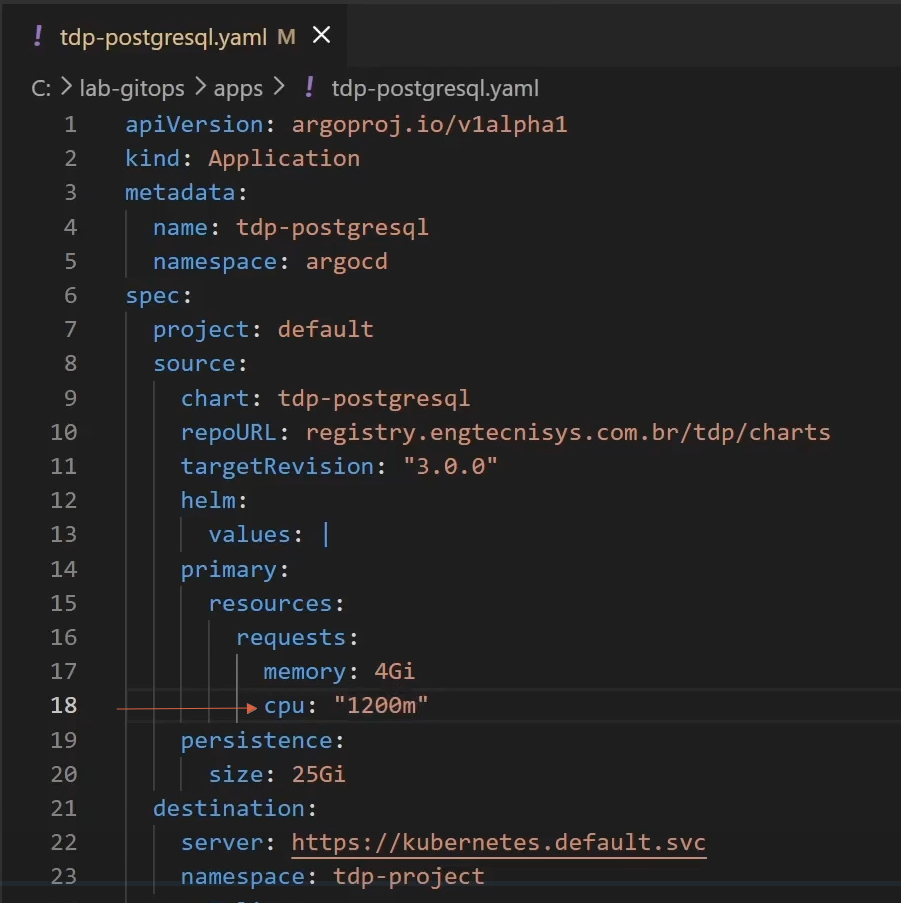
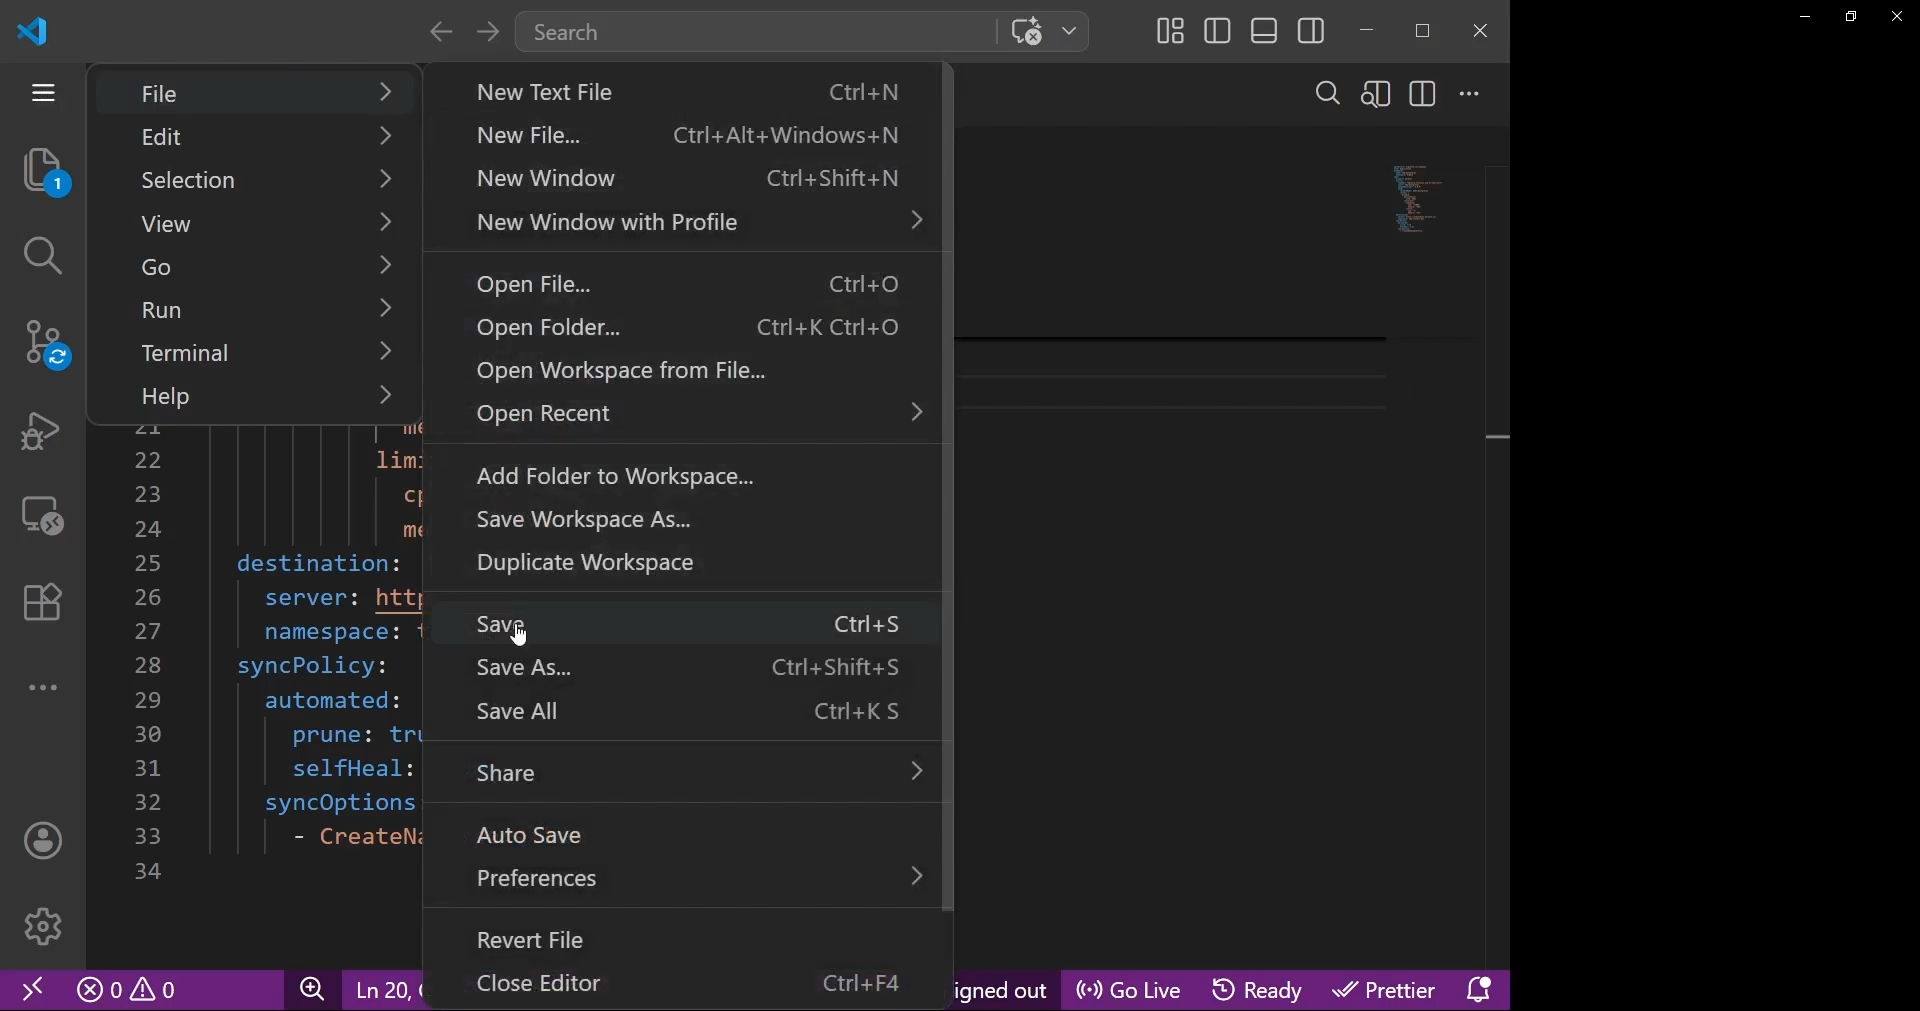
- Save and push the change:
git add .
git commit -m "config: adjust component parameters"
git push origin main
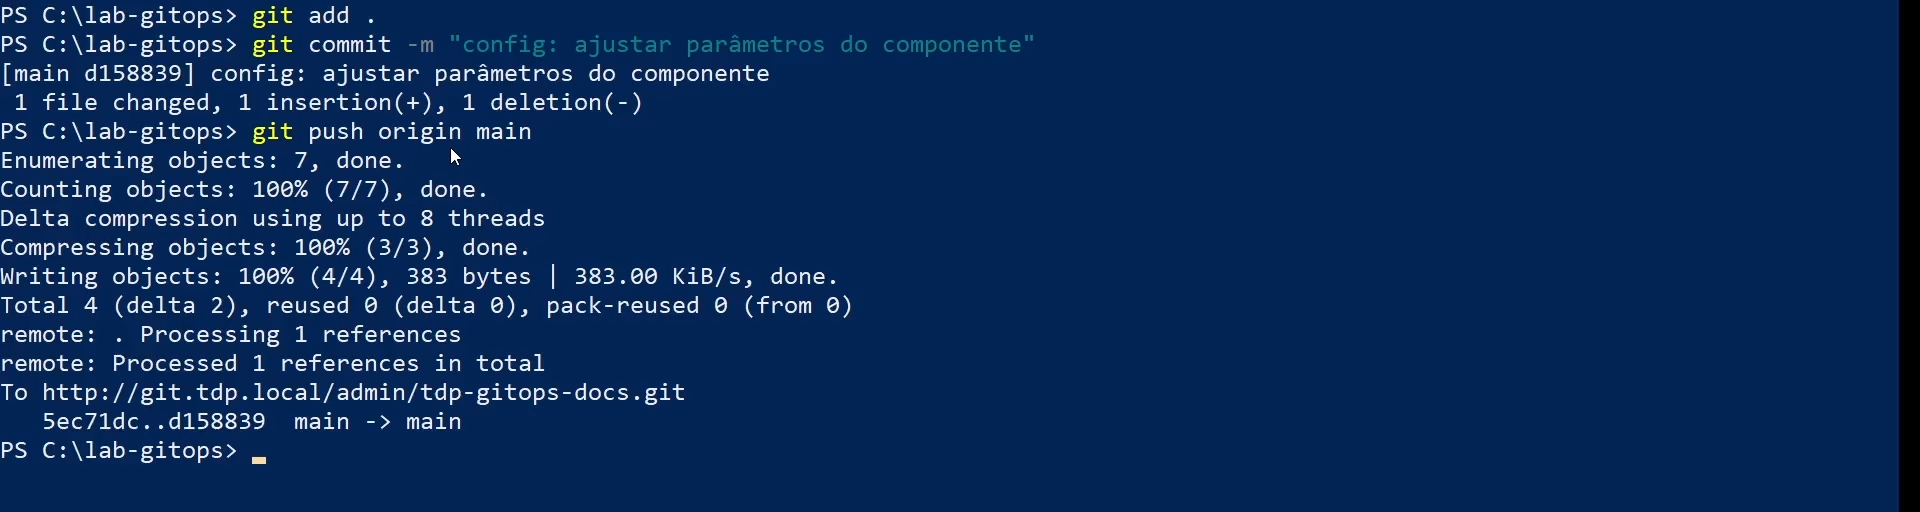
Argo CD will automatically detect the change and start synchronization.
- Verify that the Application moves to
SyncedandHealthy:
argocd app list

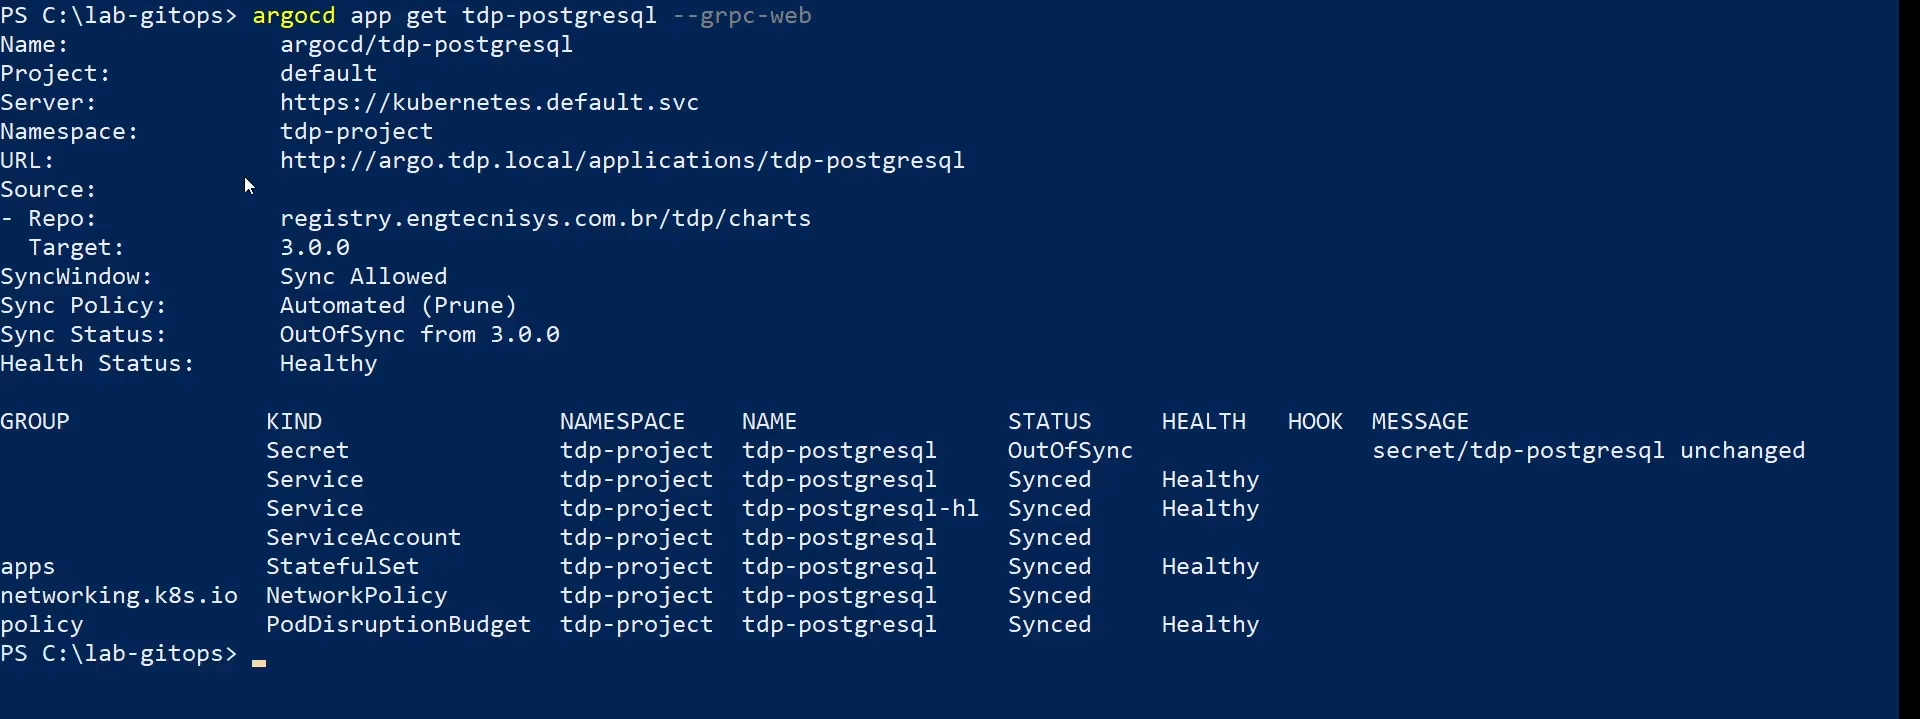
- To inspect the component Application in detail:
argocd app get <APPLICATION_NAME>
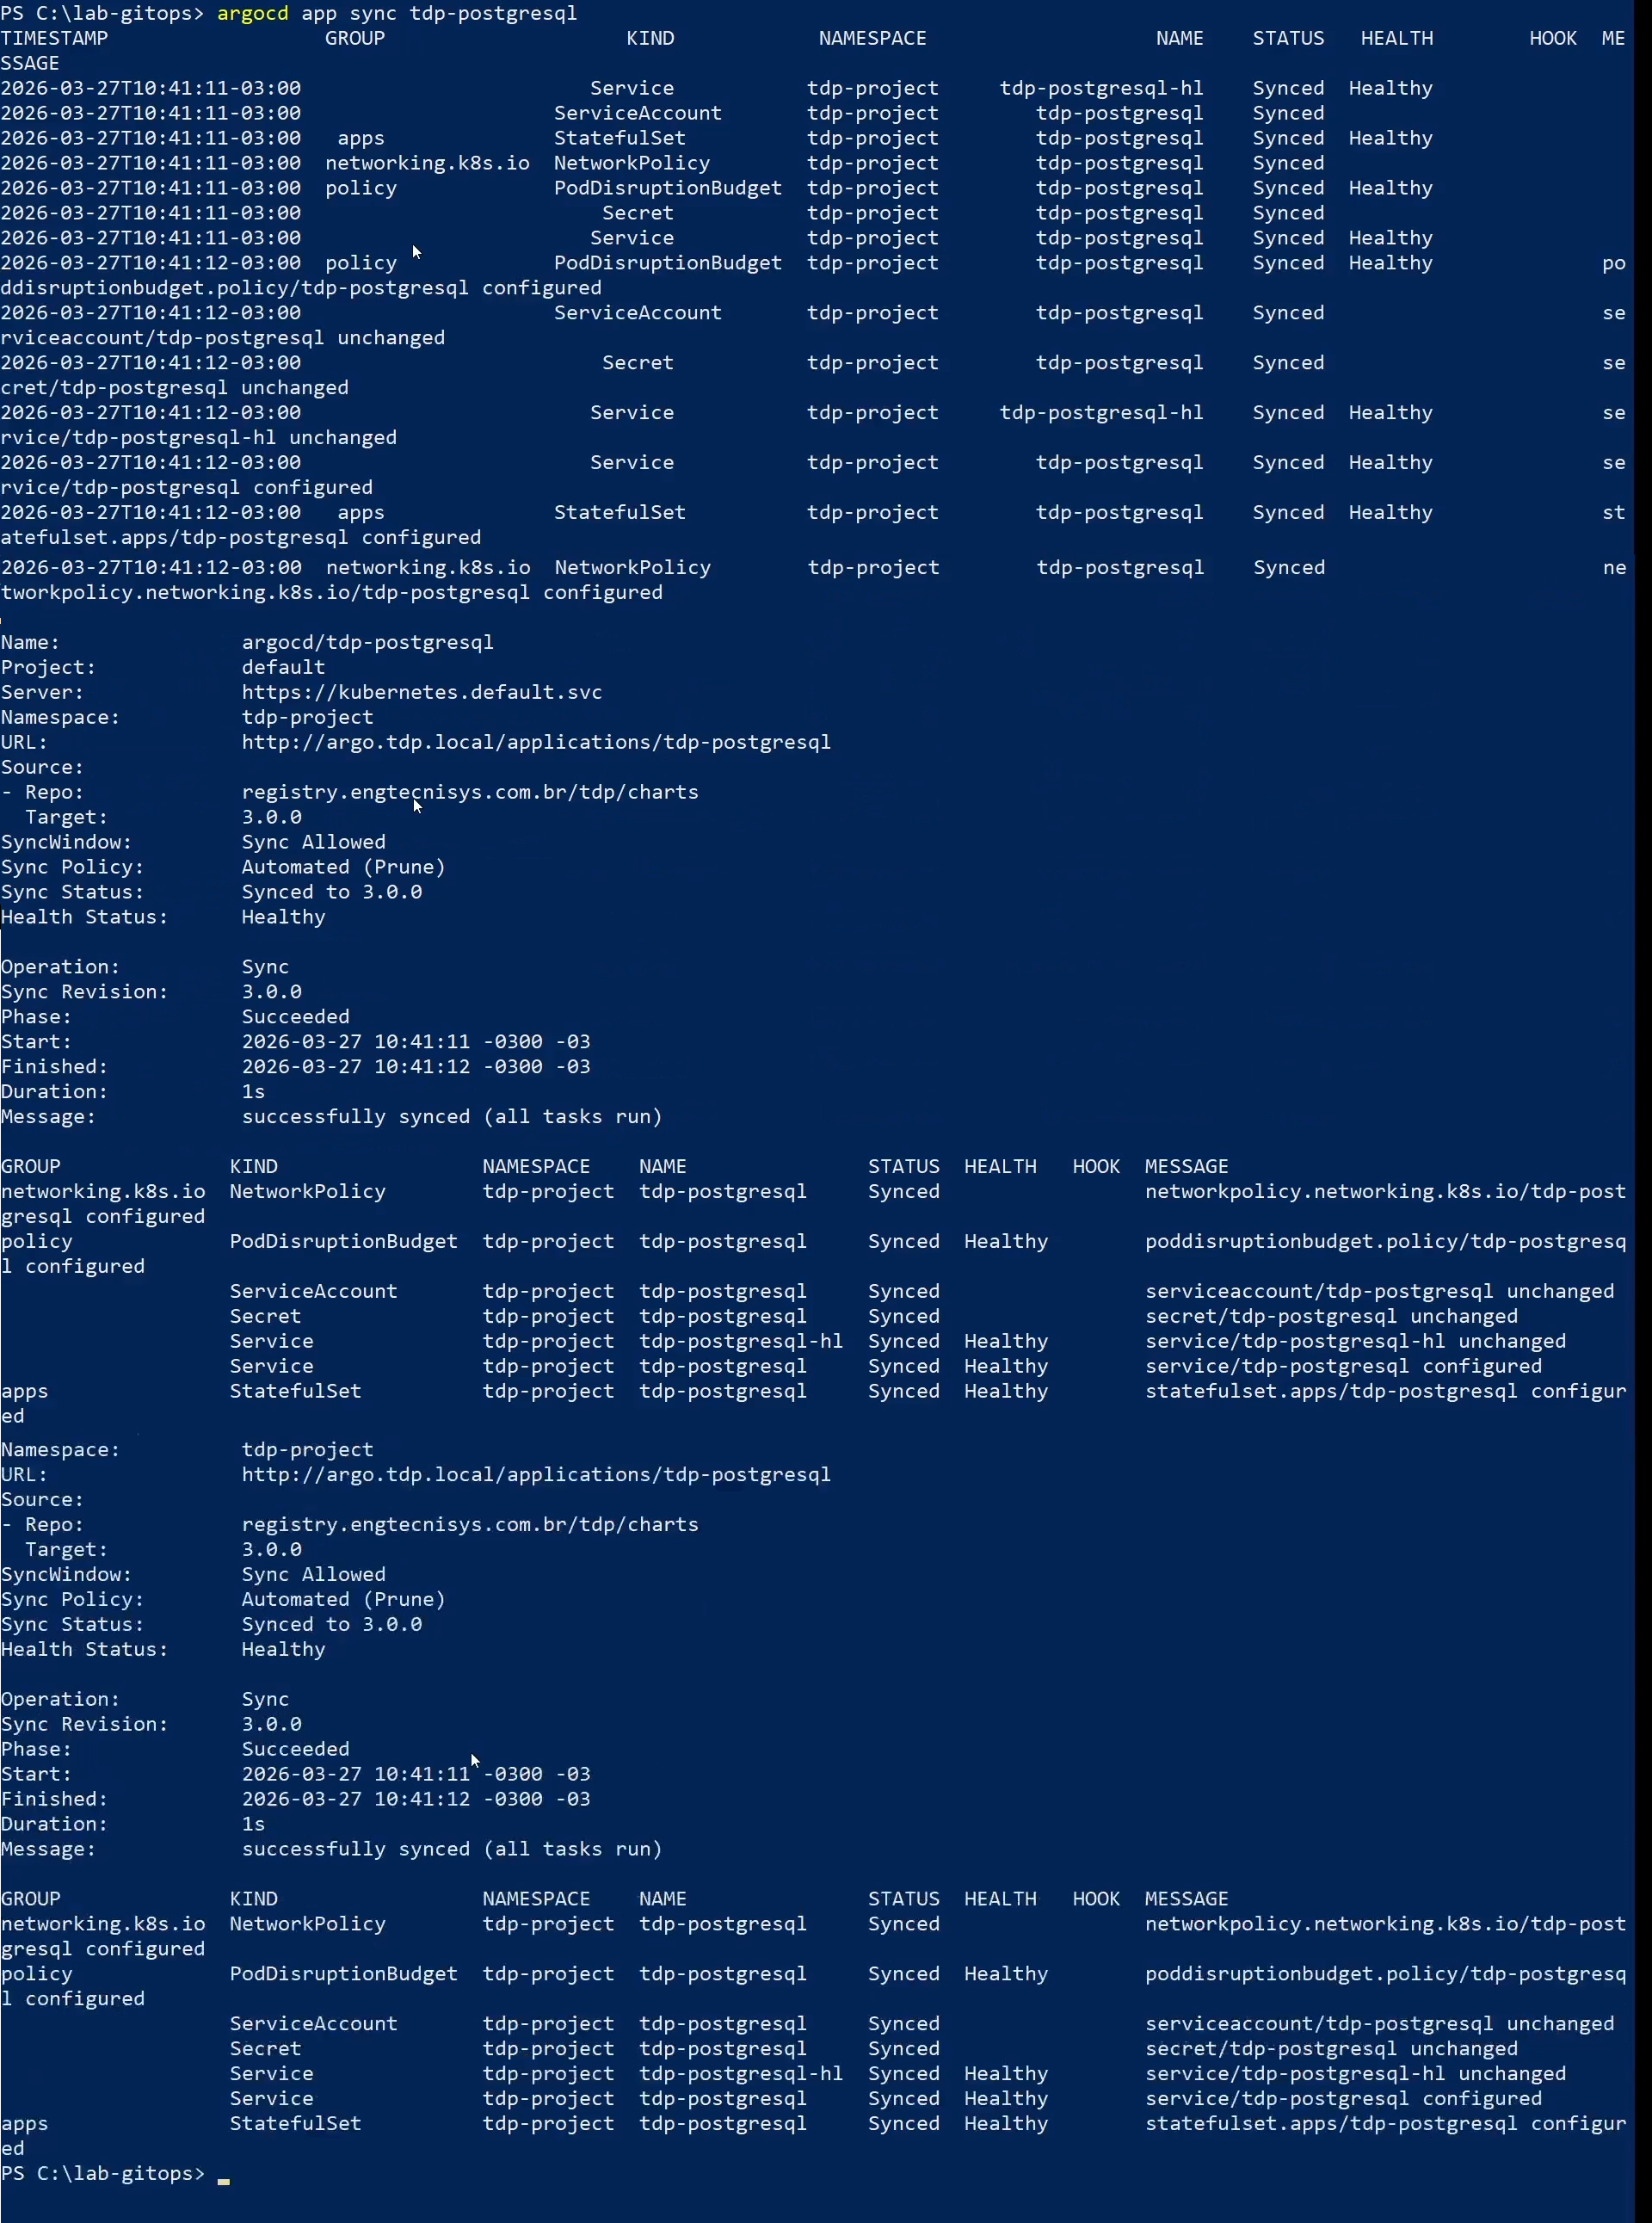
- If automatic synchronization is not enabled, or if you want to apply the change immediately:
argocd app sync <APPLICATION_NAME>
- Check the pods:
kubectl get pods -n <NAMESPACE>

For stateful components, such as PostgreSQL, also validate:
kubectl get statefulset -n <NAMESPACE>

For components using Deployment, also validate:
kubectl get deploy -n <NAMESPACE>
Confirm that pods are in Running state and workloads show all replicas ready.
- Adjust parameters
- git push
- argocd app list
- argocd app get
- argocd app sync
- kubectl get pods
- kubectl get statefulset
To access a specific component configuration, go back to the configuration index.
TDP Kubernetes charts share the configuration patterns described below.
Refer to the chart's values.yaml and the component page in this guide for the exact parameters.
Component default and configuration review
In general, the first installation of a component starts from the default behavior defined by the chart.
This default exists to allow the service to be deployed with the minimum set of external dependencies, facilitating initial validation, controlled tests, and first accesses.
When moving to more stable or shared environments, configuration is typically reviewed in areas such as database, persistence, authentication, external exposure, observability, and integration with common platform services.
This review does not change the component's main function, but adjusts how it fits the operational requirements of the environment.
For this reason, the specific component pages first describe the initial behavior and then the configuration blocks that normally require attention in lab, staging, or production.
Namespace
Each component can be installed in a dedicated namespace or share a namespace with other components, according to the environment strategy:
# Dedicated namespace (illustrative example)
helm upgrade --install <RELEASE_NAME> oci://registry.tecnisys.com.br/tdp/charts/<CHART_NAME> \
  -n <DEDICATED_NAMESPACE> --create-namespace

# Same chart in a namespace shared with other components
helm upgrade --install <RELEASE_NAME> oci://registry.tecnisys.com.br/tdp/charts/<CHART_NAME> \
  -n <SHARED_NAMESPACE> --create-namespace
Resources (CPU and memory)
Many charts allow configuring requests and limits for CPU and memory for the main pods.
Example structure:
<CHART_VALUES_KEY>:
  resources:
    requests:
      cpu: "500m"
      memory: "1Gi"
    limits:
      cpu: "2"
      memory: "4Gi"
Always define requests and limits to ensure Kubernetes schedules pods appropriately and avoids resource shortage issues.
Data persistence
Charts that require persistent storage typically expose PVC (Persistent Volume Claim) options.
Example structure:
<CHART_VALUES_KEY>:
  persistence:
    enabled: true
    size: 10Gi
    storageClassName: "<STORAGE_CLASS>"
    accessMode: ReadWriteOnce
For components that run on multiple nodes and need concurrent access to the same volume, use ReadWriteMany (RWX) in accessMode.
Make sure your StorageClass supports this mode.
External HTTP Exposure
TDP supports two alternative mechanisms to expose components via HTTP/HTTPS:
| Mechanism | Activation key | When to use |
|---|---|---|
| Ingress | TDP-Settings.gateway.ingress.enabled: true | Clusters with an Ingress Controller installed (nginx, traefik, HAProxy…) |
| Gateway API | TDP-Settings.gateway.gatewayApi.enabled: true | Clusters with Gateway API v1 support (Envoy Gateway, Istio…) |
Enable only one mechanism at a time. After enabling, configure the component-specific parameters in the corresponding chart (hostname, TLS, ingressClassName or gatewayClassName).
For full prerequisites, per-component examples, TLS and validation, see External Exposure: Ingress and Gateway API.
Services (ClusterIP, NodePort, and LoadBalancer)
A Kubernetes Service creates a stable access point for a component's Pods. Even if Pods are recreated or their IPs change, the Service keeps a logical address that other components can use to connect.
When a chart exposes Service options, the service.type field defines how that access will be made available:
| Type | What it does | When to use |
|---|---|---|
ClusterIP | Exposes the service only inside the Kubernetes cluster. | Recommended default for internal communication between components. |
NodePort | Opens a port on each cluster node, allowing external access through the node IP. | Useful for tests or environments without Ingress/Gateway, but less suitable for production. |
LoadBalancer | Requests an external load balancer from the cluster infrastructure. | Used when the Kubernetes environment provides integration with an external load balancer. |
<CHART_VALUES_KEY>:
  service:
    type: ClusterIP
For most TDP components, ClusterIP is sufficient because external exposure should preferably be handled through Ingress or Gateway API when HTTP/HTTPS access is required from browsers or external clients.
Secret management
TDP charts follow security best practices for credentials and sensitive data.
Kubernetes Secrets
Credentials must be stored in Kubernetes Secrets, never as plain text in values files:
kubectl -n <NAMESPACE> create secret generic meu-secret \
  --from-literal=password='<PASSWORD>'
Referencing Secrets in the values file
In the values file, reference existing Secrets instead of putting passwords in plain text:
passwordSecret:
  name: "meu-secret"
  key: "password"
Never store credentials in values files that will be versioned in Git.
Use Kubernetes Secrets, Sealed Secrets, or tools like HashiCorp Vault.
TDP-Settings
Several TDP charts use the TDP-Settings section for configuring shared services, such as external database and S3 connections:
TDP-Settings:
  externalDatabase:
    enabled: true
    recreate: false
    externalSecret:
      releaseName: "<POSTGRESQL_RELEASE>"
      area: "<SERVICE_KEY>"

  s3Connection:
    enabled: true
    secretName: "<S3_SECRET_NAME>"
    uri: "https://<S3_ENDPOINT>"
recreate fieldThe recreate field controls whether the component's database should be recreated during reinstallation:
false(default): keeps existing data. Use in production environments.true: drops and recreates the database. Use only when certain the database can be removed.
Before configuring TDP components, identify the environment characteristics that influence chart values, such as persistent storage, orchestrator, security policy, shared database, and external services.
Helm Charts Registry
TDP charts are distributed via the Tecnisys OCI registry.
| Registry | Use |
|---|---|
oci://registry.tecnisys.com.br/tdp/charts/ | OCI path for stable, validated TDP charts (each chart at its sub-path, e.g. .../charts/tdp-cloudbeaver) |
Registry authentication is an installation prerequisite, not a component configuration.
For the complete login and access validation procedure, see Prerequisites.
Storage decisions
TDP components that use persistence (databases, logs, DAGs, cache) require the Kubernetes cluster to have at least one StorageClass available.
The StorageClass defines how the cluster provisions persistent volumes (PVCs).
Common examples:
| Type | Description | When to use |
|---|---|---|
| Local | Direct storage on the node (e.g.: local-path-provisioner) | Development, testing, non-critical environments |
| NFS | Shared Network File System | Environments where multiple nodes need to access the same volume |
| Cloud | Managed storage (e.g.: EBS on AWS, AKS, GKE) | Cloud production |
| SAN/Dedicated storage | External storage (e.g.: enterprise NFS, Ceph) | On-premises production with availability SLA |
In your cluster, list the StorageClasses and identify which to use:
kubectl get storageclass
Example output:
NAME            PROVISIONER             RECLAIMPOLICY   VOLUMEBINDINGMODE
local-path      rancher.io/local-path   Delete          WaitForFirstConsumer
nfs-fast        nfs.provisioner.io      Delete          Immediate
If no StorageClass is marked with * (default), identify which to use and configure it in the chart values:
tdp-componente:
  persistence:
    storageClassName: "nfs-fast"  # Use the name of your cluster's StorageClass
Some components (e.g.: Airflow with KubernetesExecutor, NiFi) run multiple replicas or concurrent pods that need to share the same volume.
In these cases, check if the StorageClass supports ReadWriteMany (RWX):
kubectl describe storageclass <STORAGE_CLASS>
If the StorageClass only supports ReadWriteOnce (RWO), consult the component configuration page to find out if RWO is sufficient or if you need a different StorageClass.
Orchestrator compatibility and security adjustments
Since release 3.0.1, TDP components support:
- Red Hat OpenShift 4.19+
- Rancher Manager 2.10.x+
In addition to Kubernetes 1.32+.
OpenShift: General considerations
OpenShift is an enterprise distribution of Kubernetes that adds security layers above the Kubernetes standard.
One of these is Security Context Constraints (SCC), which restrict:
- Which UIDs/GIDs containers can use
- Whether containers can run as root
- Which Linux capabilities are allowed
Default: leave UID/GID empty
For compatibility with OpenShift's restricted SCC, leave the uid and gid fields without a value (~ in YAML):
# In values.yaml, set:
uid: ~
gid: ~
This allows OpenShift's SCC to automatically assign a UID within the namespace's reserved range, without conflicts.
Default: global.compatibility.openshift.adaptSecurityContext: force
Several TDP charts (and bundled Bitnami charts) use this parameter to adapt to the OpenShift security model:
tdp-componente:
  global:
    compatibility:
      openshift:
        adaptSecurityContext: force
This forces the chart to remove security restrictions incompatible with the restricted SCC.
Automatic Role Binding for SCC
If the component needs privileges above the default restricted (e.g.: root to install packages), the chart can create a RoleBinding that adds ServiceAccounts to the anyuid SCC:
rbac:
  createSCCRoleBinding: true
Each component may have specific OpenShift requirements.
Check the component configuration page (e.g.: OpenMetadata) to see if there are dedicated sections for "Installation on OpenShift".
Rancher: compatibility note
Rancher Manager is a platform that manages multiple Kubernetes (and OpenShift) clusters.
Compatibility with Rancher 2.10.x+ means that TDP components:
- Can be deployed in clusters managed by Rancher
- Follow the same security and configuration practices as in standard Kubernetes
- Inherit Rancher's network and security policies when applicable
No additional Rancher-specific configuration is needed beyond the usual Kubernetes configurations.
Internal vs external PostgreSQL
Several TDP components need a relational database to store their own metadata.
Each component's chart supports two modes:
| Mode | Description | When to use |
|---|---|---|
Embedded PostgreSQL (postgres.enabled: true) | Subchart installed alongside the component, self-contained | Development, isolated tests, temporary environments |
External PostgreSQL (postgres.enabled: false) | Uses the tdp-postgresql already installed in the cluster | Production, shared environments |
With external shared PostgreSQL (tdp-postgresql), you centralize:
- Backups: a single backup point for all platform metadata databases
- Monitoring: metrics and alerts in one place
- Sizing: adjust
max_connectionsand resources once for the entire platform
Embedded PostgreSQL is convenient but isolated — each component manages its own database, which increases operational overhead in production.
The CloudBeaver chart can store application metadata (UI settings, local users, etc.) in an external PostgreSQL in addition to the workspace volume (database.enabled: true), aligned with the "external PostgreSQL" mode in this section.
Steps and examples: Configuration — CloudBeaver.
S3-compatible storage (Ozone, MinIO, or another endpoint)
Some TDP components need to access S3-compatible object storage to read or write files (input data, pipeline outputs, logs, DAGs).
In TDP Kubernetes, the stack's native S3 backend is Apache Ozone (tdp-ozone), via its S3 Gateway — but any S3-compatible endpoint (MinIO or a cloud service) can be used instead; the connection mechanism is the same.
When a component has TDP-Settings.s3Connection.enabled: true, the chart automatically creates a Kubernetes Secret with the connection parameters (endpoint, access key, secret key).
This Secret is then referenced by the component's operators and connectors to access the configured S3 endpoint — Ozone, MinIO, or another.
Configure the S3 connection when the component needs to:
- Read input data stored in S3 (e.g.: Spark reading Parquet)
- Write outputs to S3 (e.g.: Airflow pipeline results)
- Maintain files between runs (e.g.: Airflow DAGs stored in S3)
If the component is used only with in-memory data or local PVCs, the S3 connection is not needed.