Database Service Installation
PostgreSYS, via PgSmart, provides a streamlined and customizable approach to installing PostgreSQL and the PostGIS extension for georeferencing.
In addition to offering all necessary installation packages in one place, PgSmart allows a single guided operation to install PostgreSQL binaries, initialize a database instance or cluster, and create the corresponding system service.
-
PgSmart CLI must be installed, after meeting the minimum requirements.
-
An additional package repository is required to resolve indirect dependencies. According to each organization's security and support policies, Tecnisys does not provide such packages. However, for Enterprise Linux family distributions, the Extra Packages for Enterprise Linux - EPEL repository generally provides the necessary indirect dependencies.
-
The PgSmart Agent needs to be installed and running on the machine where the database service will be installed.
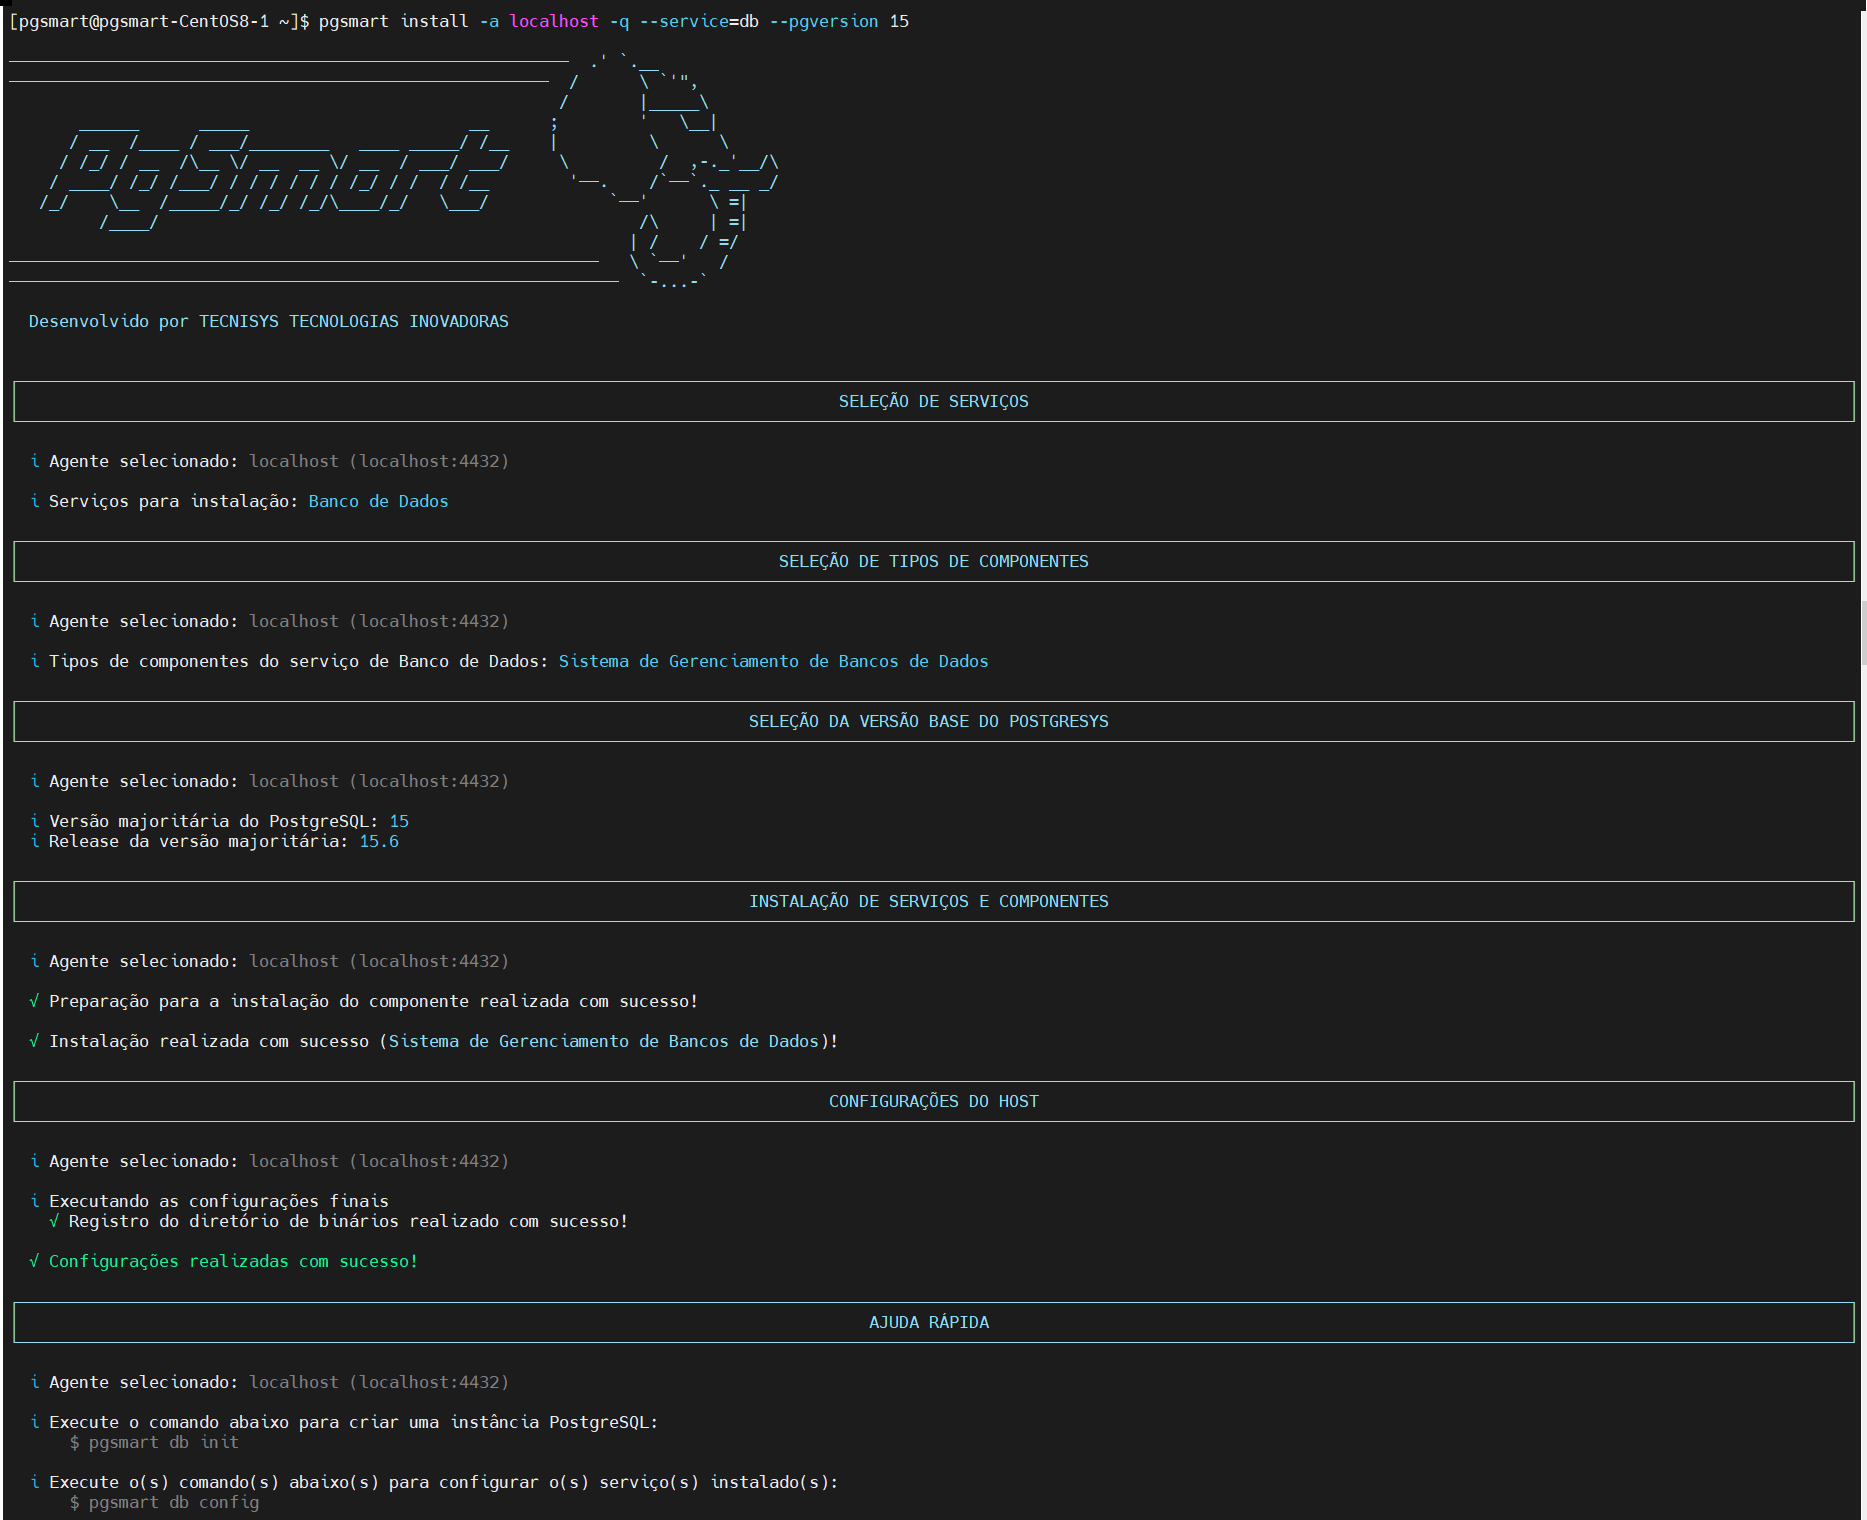
pgsmart install -s db [Flags]
pgsmart install --service=db [Flags]
Flags:
-M, --pg-version=11–17 => Defines the PostgreSQL major version to install. The latest available release will be used.-a, --agent=<agent>=> Defines the alias, hostname, or IP address where a PgSmart Agent is installed.-h, --help=> Shows help.-q, --quiet=> Non-interactive execution for service installation. Used with --service, --pg-version, and --agent.-s, --service=db=> PostgreSYS Platform Database Service.--geo-component=> Installs the Georeferencing component (PostGIS), used with the --quiet option.
This installation mode is activated by the quiet option (--quiet, -q) and uses default values for parameters not provided. However, this option is disabled during the first installation due to the need to create the PostgreSYS package repository based on information requested interactively.
Non-Interactive Installation - Database Management System Installation
- Command
- Video
pgsmart install -a <agent> -q --service=db --pg-version=(11|12|13|14|15|16)
Non-Interactive Installation - Geo-Component Extension
- Command
- Video
pgsmart install -a <agent> -q --geo-component -M 15

- Instructions
- SGBD
- PostGIS
- pgvector
- pgembed
pgsmart install
Interactive Installation - Database Service
-
Select the
PgSmart Agent(or Register a new Agent).1.1 Select
Banco de Dados.1.2 Select
Sistema de Gerenciamento de Banco de Dados.1.3 Select the
PostgreSQL Major Version.1.4 Select the
Releaseof the selected major version.1.5 Confirm whether to update the PostgreSYS package repository.
1.5.1 If yes, select
Provideand enter:-
Repository URL
-
Identification code
-
Repository name
-
Repository user (optional)
-
Repository password (optional)
-
Confirm whether to enable GPG key verification
-
If yes, provide the path to the GPG key file
note-
For a local installation, don't forget to download and import the public GPG key of the repositories (PGSYS-GPG-KEY).
For example, for RHEL, CentOS and similars:
URL da Chave GPGhttps://repo.tecnisys.com.br/repository/yum/pgsys/components/4.1/rhel-8-x86_64/PGSYS-GPG-KEY/PGSYS-GPG-KEYfor SUSE and similars:
URL da Chave GPGhttps://repo.tecnisys.com.br/repository/zypp/pgsys/components/4.1/sles-15-x86_64/PGSYS-GPG-KEY/PGSYS-GPG-KEYfor Debian, Ubuntu and similars:
URL da Chave GPGhttps://repo.tecnisys.com.br/repository/apt/pgsys/components/4.1/PGSYS-GPG-KEY.asc -
The compressed tar.gz installation packages already include the GPG public key.
-
-
1.6 Database Instance Initialization
-
After completing the component installation, the next step is to initialize a database instance. This is crucial to prepare the database for use by configuring and starting the necessary services.
-
Confirm whether to initialize a database instance now.
-
If confirmed, the system will proceed with the Instance Initialization process.
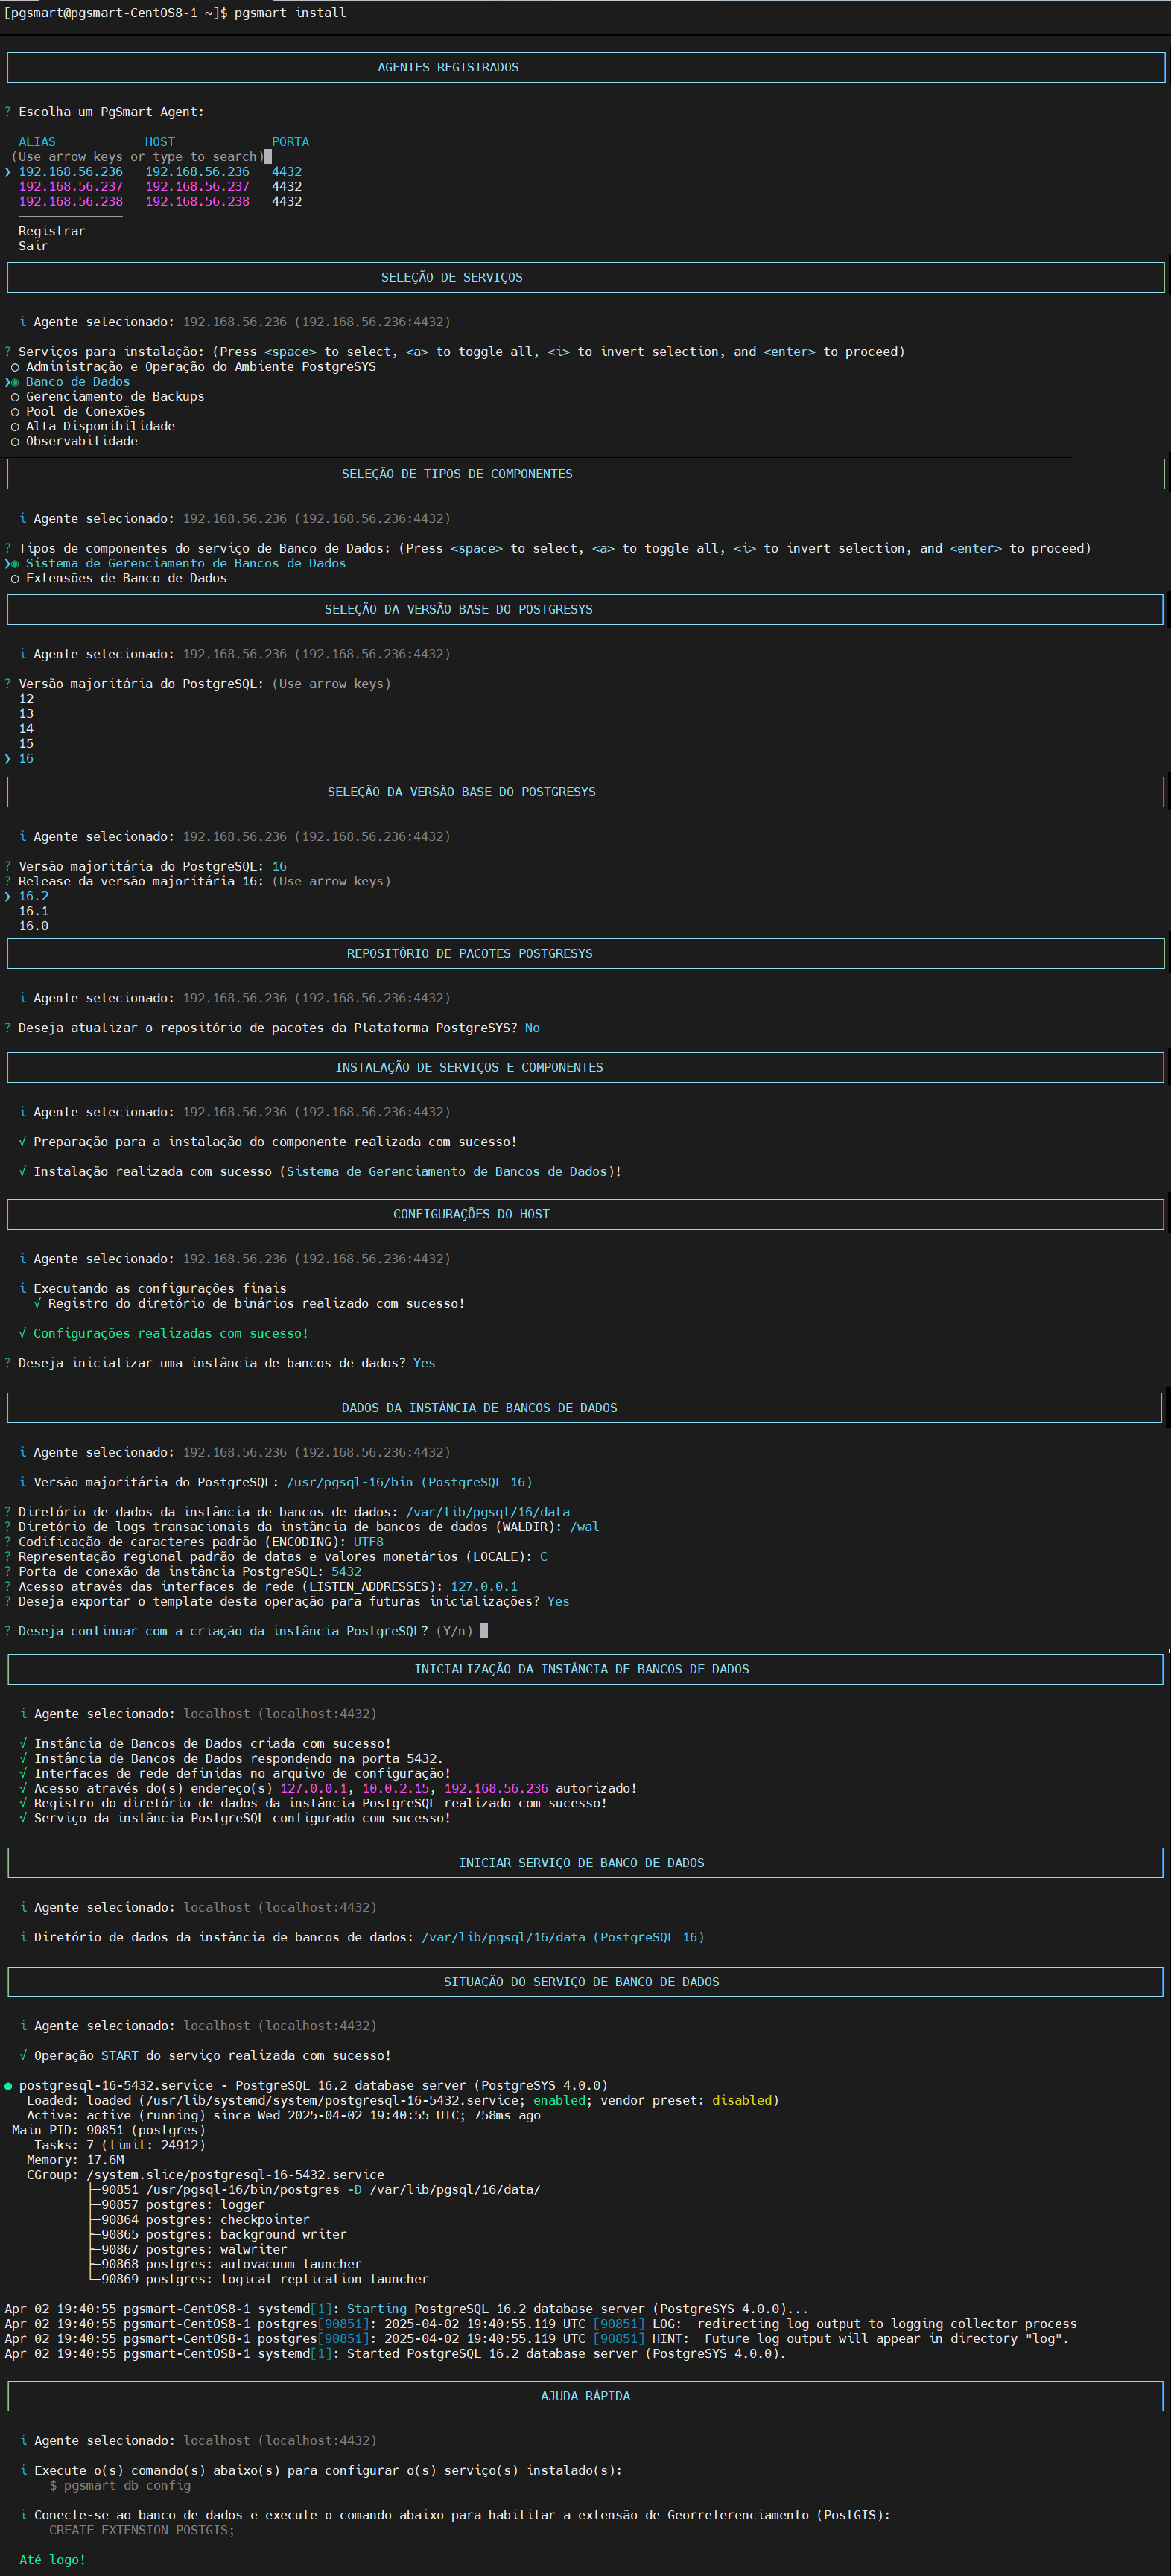 Figure 3 - Interactive Database Installation
-
Interactive Installation - Database Extensions
-
Select the
Extensões de Banco de Dadosand the component to be installed.2.1 Confirm extension installation.
2.2 Confirm whether to install/update the PostgreSYS package repository (required if not yet configured).
2.3 If yes, provide the repository URL.
noteThe package repository installation will not be executed if the pgsys repositories are already present or mapped on the machine.
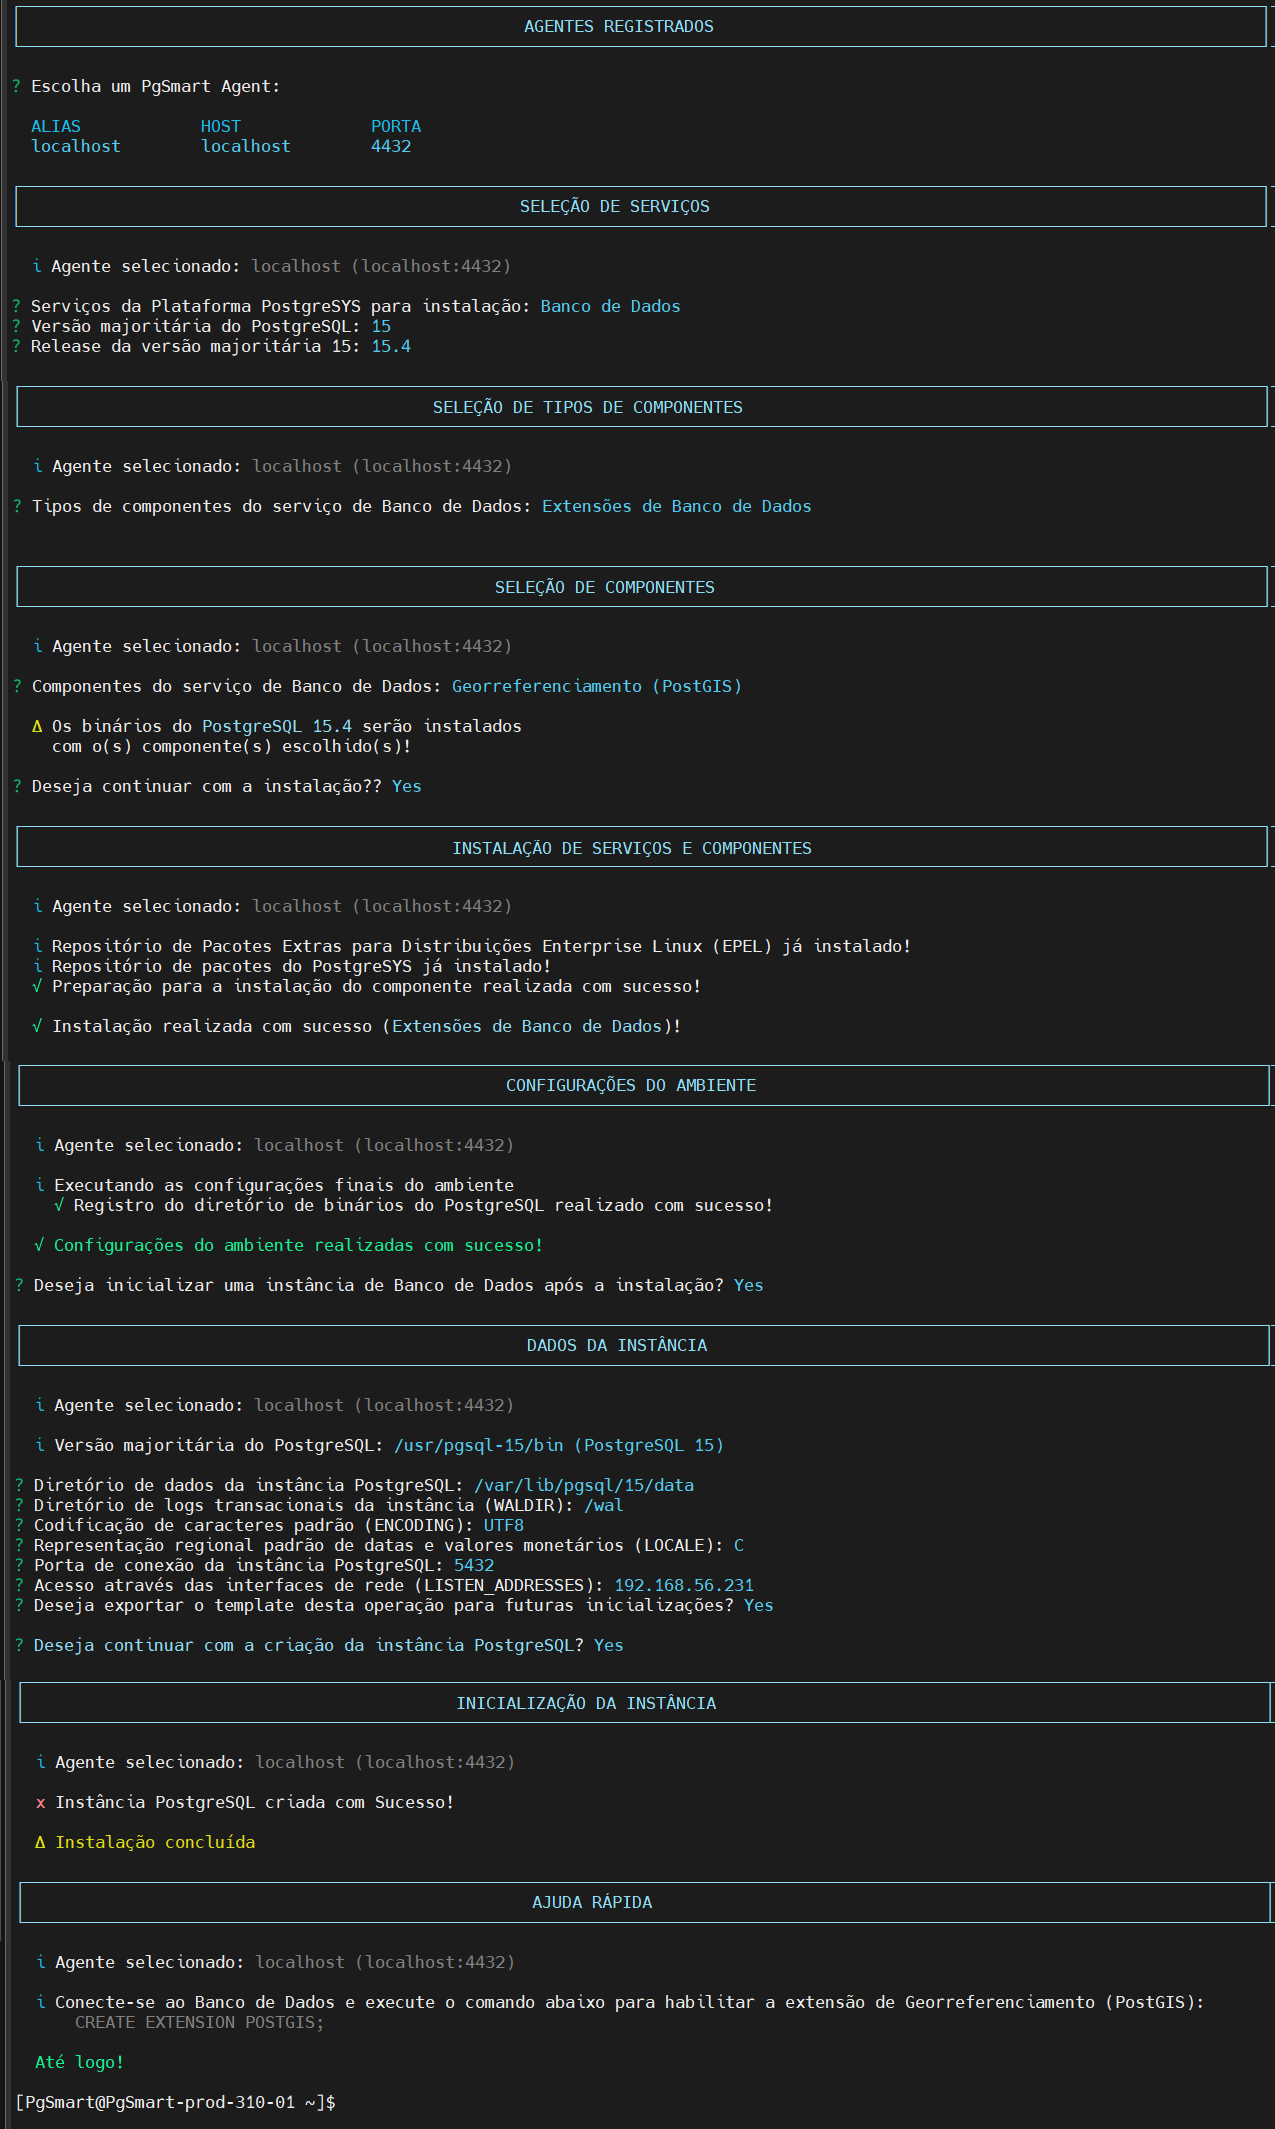 Figure 4 - Interactive Installation of PostGIS Extension
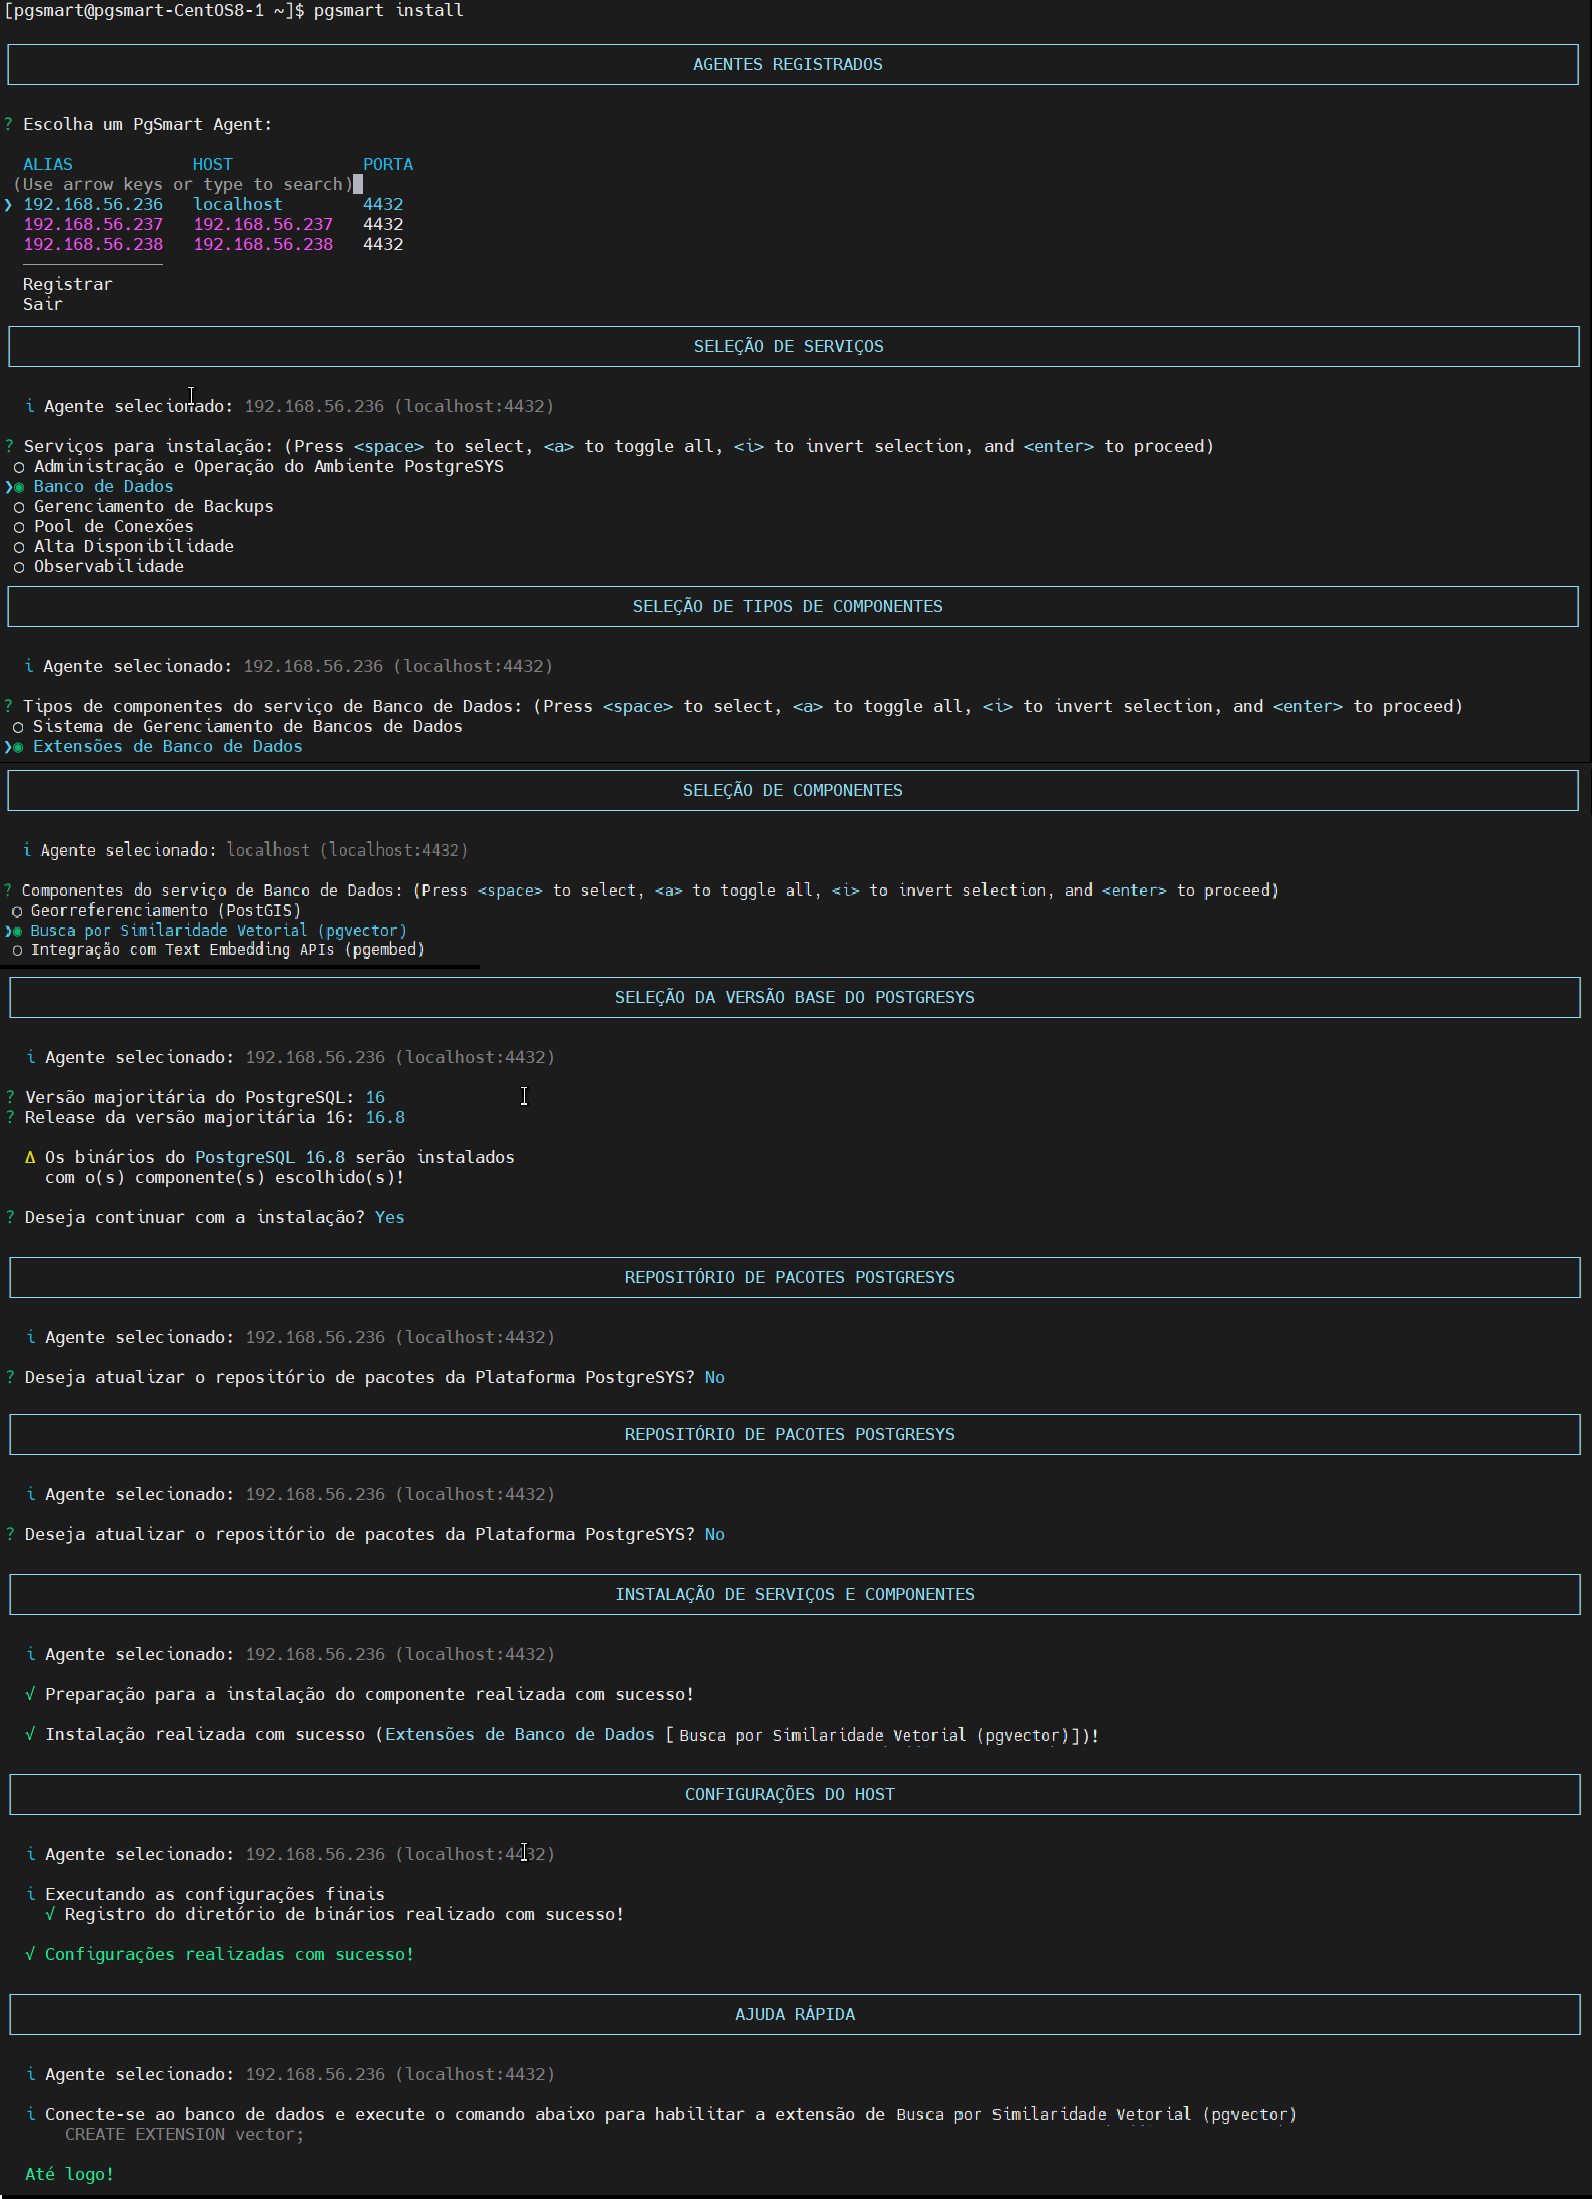 Figura 5 -Extension installation pgvector interactive
 Figura 6 -Extension installation pgembed interactive
 -
Connect to the database and run the command corresponding to the extension you installed::
Terminal inputCREATE EXTENSION POSTGIS;
CREATE EXTENSION vector;
CREATE EXTENSION pgembed;
Command Variations for Interactive Installation
Some parameters may be passed in advance through the command, but without the quiet option (--quiet, -q), execution remains interactive, and these parameters will be used as default values in the prompts.
Examples:
pgsmart install --service=db
pgsmart install --pg-version=15
Remember to check the installation logs for any warnings or errors during the process. These log files may provide valuable information in case of problems or for fine-tuning configurations.
tail -f /var/log/pgsmart-agent/pgsmart.log
tail -f /var/log/pgsmart-client/pgsmart.log
PgSmart defines environment variables (PGDATA, PGBIN, among others) in the current user's bash_profile, which will be loaded in new sessions. Run the following command to apply them immediately:
source ~/.bash_profile