Sandbox TDP
- Operating System: Windows 10 or higher, or Linux with VirtualBox 7 or higher
- Processor: 4 vCPUs available
- RAM: 10 GB available
- Available disk space: Initially 100 GB, potentially expanding to 140 GB
- VirtualBox installed and configured
What is the TDP Sandbox?
The TDP Sandbox is a pre-configured virtual machine that emulates a single-node TDP cluster. It allows you to explore, in a limited way, functionalities such as:
- Data ingestion and transformation.
- Data pipeline execution.
- Integration testing with analytical tools.
This solution is ideal for developers, data analysts, and administrators who want to experiment with or test some of the advanced data transformation, processing, and analysis features before implementing them in production.
This guide will help you with importing, configuring, accessing, and using the TDP Sandbox.
Importing the TDP Sandbox
Follow the instructions below to import and start the TDP Sandbox:
-
Download the sandbox image (
.ovafile) using the Tecnisys Public Package Repository.In the Tecnisys Public Package Repository, the sandbox images are available in the
/sandbox/tdp/directory.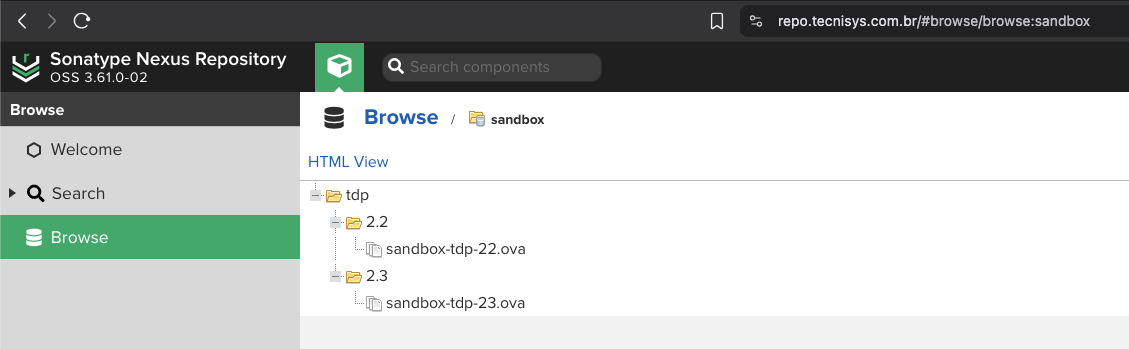 Figure 1 - Tecnisys Public Package Repository
 -
Import the TDP sandbox image:
2.1. Open VirtualBox. 2.2. In the top menu, click File → Import Appliance (or use the shortcut
Ctrl + I). Figure 2 - Importing the .ova file
2.3. In the window that opens, select the TDP sandbox
.ovafile you downloaded. 2.4. ClickFinishto start importing the virtual machine (VM) image.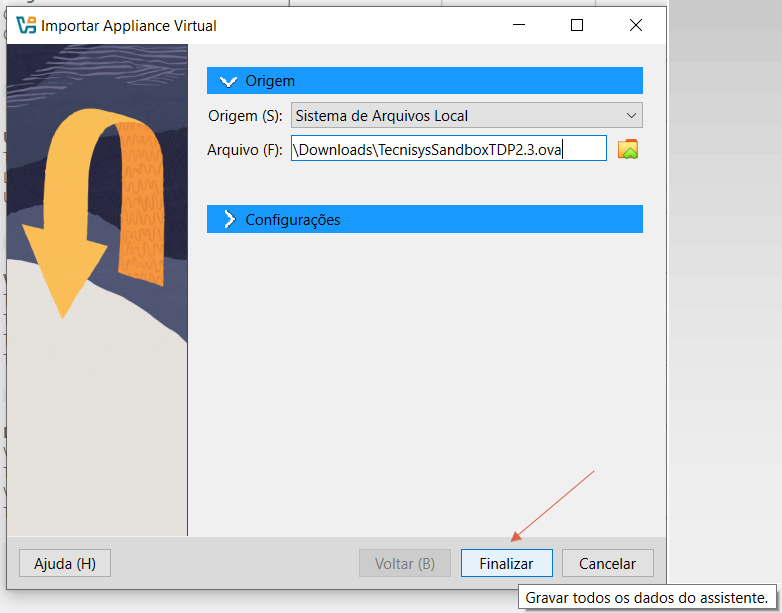 Figure 3 - Importing the .ova file
2.5. Accept the TDP Sandbox license agreement by clicking
I Agree. Figure 4 - Accepting the terms and conditions of the license agreement
2.6. Wait for the VM image import to complete.
2.7. Start the imported VM.
 Figure 5 - Virtual Machine Initialization
2.8. Wait for the VM to start and display the customized initial screen.
2.9. The TDP Sandbox is ready to use!
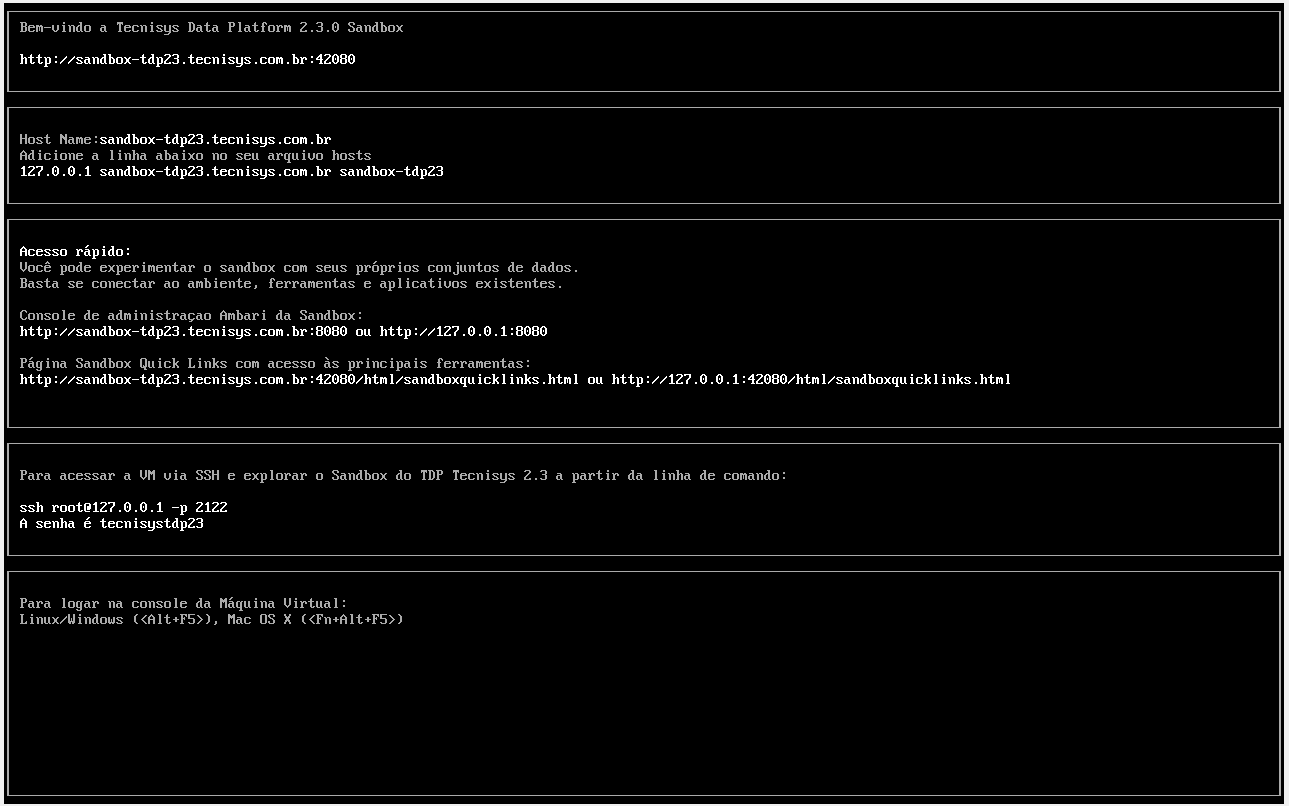 Figure 6 - SandBox ready to use
 -
Configure the TDP Sandbox name resolution:
When using a local VM for testing and studies, it's recommended to map the VM's domain locally. This configuration facilitates access to the environment, enables port forwarding, and more realistically simulates a production environment, eliminating dependency on external DNS servers.
3.1. Configure the
hostsfile on the local host (Windows or Linux), associating the IP 127.0.0.1 with the sandbox hostname (FQDN) (sandbox-tdp<MAJOR VERSION><MINOR VERSION>.tecnisys.com.br). For example:sandbox-tdp23.tecnisys.com.br.noteThe
hostsfile is a local configuration file present in operating systems such as Windows (C:/Windows/System32/drivers/etc/hosts) and Linux (/etc/hosts). It serves to resolve domain names to IPs, eliminating the need to query an external DNS server.3.1.a. Configuring the hosts file on Linux.
3.1.a.1. Open the
hostsfile with a text editor of your choice. In this tutorial, we usevi:Terminal inputsudo vi /etc/hosts3.1.a.2. Add a new line at the end of the file (in
vi, pressGto go to the end of the file andito insert a new line) with the resolution of the IP127.0.0.1to the sandbox hostname. Note that after the IP, you should specify the hostname with the domain (FQDN), followed by a space, and then just the hostname. See the example below for the TDP 2.3 Sandbox:Terminal input127.0.0.1 sandbox-tdp23.tecnisys.com.br sandbox-tdp233.1.a.3. Save and close the file (in
vi, pressESCand type:wq).3.1.b. Configuring the hosts file on Windows.
3.1.b.1. Open Notepad as Administrator.
tipRight-click on the Notepad icon and select
Run as Administrator.3.1.b.2. In Notepad, open the file
C:/Windows/System32/drivers/etc/hosts.3.1.b.3. Add a new line at the end of the file with the resolution of the IP
127.0.0.1to the sandbox hostname. Note that after the IP, you should specify the hostname with the domain (FQDN), followed by a space, and then just the hostname. See the example below for the TDP 2.3 Sandbox:Terminal input127.0.0.1 sandbox-tdp23.tecnisys.com.br sandbox-tdp233.1.b.4. Save the file.
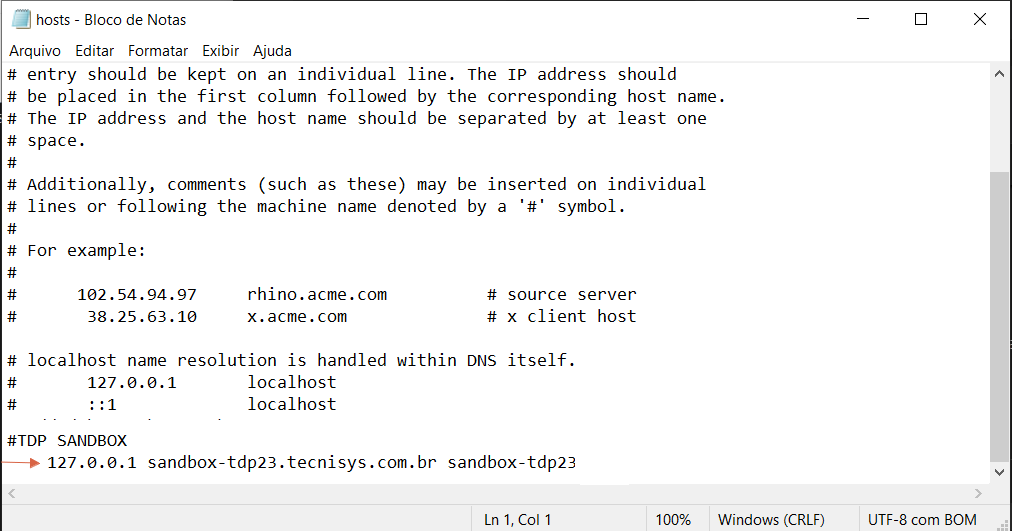 Figure 7 - Modifying the hosts file in Windows
Accessing the TDP Cluster
Once the VM is running, use the browser or terminal to interact with the TDP Sandbox services.
Sandbox Home Page
-
Open your browser and access the TDP Sandbox Home page through the following URL:
http://localhost:42080If you have locally added a name resolution for the TDP Sandbox VM, use the hostname defined in the
hostsfile. For example, for the TDP 2.3 Sandbox:http://sandbox-tdp23.tecnisys.com.br:42080 -
On the Sandbox Home page, we have the
Quick Linksarea for quick access to the web interfaces of TDP Cluster components. Select the card of the desired component to view the access URL and credentials.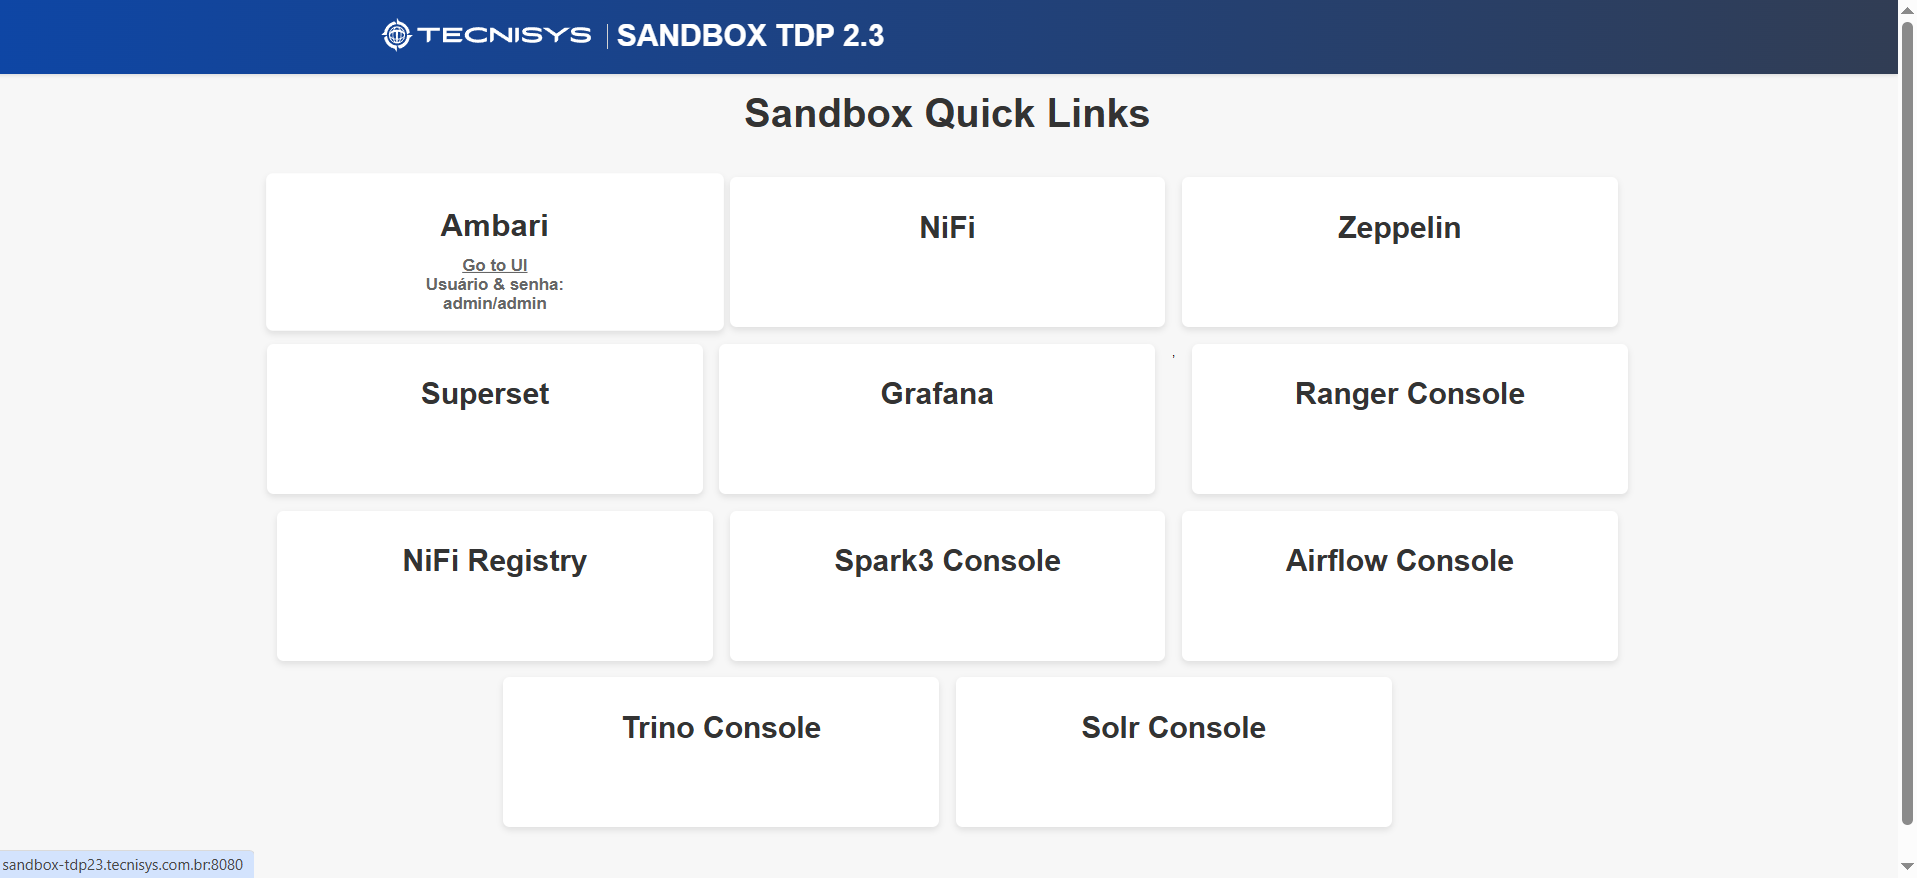 Figure 8 - TDP Sandbox Home Page
Starting TDP Cluster Services
Through the TDP Sandbox Home page, access the Apache Ambari web interface, the centralized administration component of the TDP platform, to start TDP Cluster services such as Apache Kafka, Apache NiFi, Trino, among others.
Avoid starting too many services at once, as this can lead to performance issues and instability on a local VM with limited computational resources.
-
On the Apache Ambari login screen, enter the credentials below to access:
- Username: admin
- Password: admin
-
Select the service of interest in the left sidebar menu.
-
Start all service components by clicking the
Actions→Restart Allbutton located in the upper right corner. Figure 9 - Start service
Accessing the Sandbox via SSH
Through a terminal, you can access the TDP Sandbox by establishing an SSH connection on port 2122 of the VM:
ssh -p 2122 devopstdp@localhost
Access Credentials
Below are the access credentials for users previously created in the TDP Sandbox VM:
- TDP 2.3
- TDP 2.2
| Usuário | Senha |
|---|---|
| root | tecnisystdp23 |
| sandbox | tecnisystdp23 |
| devopstdp | tecnisystdp23 |
| Usuário | Senha |
|---|---|
| root | tecnisystdp22 |
| sandbox | tecnisystdp22 |
| devopstdp | tecnisystdp22 |
The following are the main access credentials of the TDP Cluster services:
- TDP 2.3
- TDP 2.2
| Serviço | Usuário | Senha |
|---|---|---|
| Airflow | admin | tecnisystdp23 |
| Ambari | admin | admin |
| Druid Database User | druid | druid |
| Grafana | admin | tecnisystdp23 |
| Hive Database User | hive | hive |
| Kafka UI | kafka-ui | tecnisystdp23 |
| Ranger | admin | tecnisystdp23 |
| Ranger Admin Credentials for Ambari | amb_ranger_admin | tecnisystdp23 |
| Ranger Database User | ranger | ranger |
| Serviço | Usuário | Senha |
|---|---|---|
| Airflow | admin | tecnisystdp22 |
| Ambari | admin | admin |
| Druid Database User | druid | druid |
| Grafana | admin | tecnisystdp22 |
| Hive Database User | hive | hive |
| Kafka UI | kafka-ui | tecnisystdp22 |
| Ranger | admin | tecnisystdp22 |
| Ranger Admin Credentials for Ambari | amb_ranger_admin | tecnisystdp22 |
| Ranger Database User | ranger | ranger |
The following are the sensitive property values of the TDP Cluster services:
- TDP 2.3
- TDP 2.2
| Serviço | Propriedade | Valor |
|---|---|---|
| Knox | Master Secret | tecnisystdp23 |
| NiFi | CA Token | tecnisystdp23 |
| NiFi | Encryption Password | tecnisystdp23 |
| NiFi | Registry Encryption Password | tecnisystdp23 |
| NiFi | Sensitive property values encryption password | tecnisystdp23 |
| Ranger | Usersync User's Password | tecnisystdp23 |
| Ranger | Tagsync User's Password | tecnisystdp23 |
| Superset | SECRET_KEY | tecnisystdp23 |
| Superset | Superset Admin Email | admin@tecnisys.com.br |
| Superset | Superset Admin Firstname | admin |
| Superset | Superset Admin Lastname | tecnisys |
| Superset | Superset Admin Password | tecnisystdp23 |
| Serviço | Propriedade | Valor |
|---|---|---|
| Knox | Master Secret | tecnisystdp22 |
| NiFi | CA Token | tecnisystdp22 |
| NiFi | Encryption Password | tecnisystdp22 |
| NiFi | Registry Encryption Password | tecnisystdp22 |
| NiFi | Sensitive property values encryption password | tecnisystdp22 |
| Ranger | Usersync User's Password | tecnisystdp22 |
| Ranger | Tagsync User's Password | tecnisystdp22 |
| Superset | SECRET_KEY | tecnisystdp22 |
| Superset | Superset Admin Email | sandbox-tdp22@tecnisys.com.br |
| Superset | Superset Admin Firstname | tecnisys |
| Superset | Superset Admin Lastname | tdp22 |
| Superset | Superset Admin Password | tecnisystdp22 |
Communication Ports
The table below lists the services and their respective communication ports used in the TDP Sandbox. This configuration allows access to services hosted on the virtual machine.
| Application | Port |
|---|---|
| Ambari | 8080 |
| Apache | 42080 |
| Datanode | 50075 |
| Atlas | 21000 |
| Grafana | 3000 |
| Druid Router | 8888 |
| Druid Coordinator | 8081 |
| HBaseMaster | 16010 |
| HBaseRegion | 16030 |
| HDFS | 8020 |
| HiveJDBCJar | 10002 |
| HostSSH | 2122 |
| HostSSH | 2200 |
| JobHistory | 19888 |
| Kafka | 8079 |
| Knox | 8443 |
| NiFi | 9090 |
| NiFi Registry | 61080 |
| NodeManager | 8042 |
| Nodemanager | 8040 |
| ResourceManager | 8032 |
| Infra Solr | 8886 |
| Solr Admin | 8983 |
| SparkHistoryServer | 18082 |
| WebHBase | 60080 |
| Ranger | 50070 |
| Ranger | 6080 |
| YARN | 8088 |
| YarnATS | 8188 |
| Zeppelin | 9995 |
| Superset | 9088 |
| AirflowUI | 18080 |
| CeleryFlowerUI | 5555 |
| Trino | 5555 |
Use this table to access and configure services as needed.
If your local machine is already using any of the ports configured for the Sandbox, the VM will not start, and VirtualBox will present an error during the process, aborting execution.